Ping Identity OpenID Connect: Setup And Configuration Guide

Getting Ping Identity OpenID Connect up and running is one of those tasks that sounds straightforward until you're knee-deep in configuration screens, token endpoints, and redirect URIs. Ping Identity, whether you're working with PingFederate or PingOne, is a powerful identity platform, but its OIDC setup has enough moving parts to trip up even experienced engineers.
This guide walks you through the full configuration process, step by step. You'll learn how to register clients, configure scopes and claims, set up authorization endpoints, and validate tokens correctly. No guesswork, no hand-waving, just the practical details you need to get a working implementation in place.
If you're building healthcare applications that rely on secure identity flows, this is especially relevant. At SoFaaS™, we handle OAuth and authorization management as part of our managed SMART on FHIR platform, so we know firsthand how critical it is to get identity configuration right. Whether you're connecting to EHRs or securing any application with OIDC, a solid Ping Identity setup is foundational, and that's exactly what we'll help you build here.
What you need before you start
Before you touch any configuration screen, you need to gather the right information and access. Setting up Ping Identity OpenID Connect without preparation leads to incomplete configurations, failed redirects, and wasted debugging time. Taking 20 minutes to collect what you need upfront saves hours of troubleshooting once you're inside the console.
Ping Identity account and environment access
You need an active account in either PingFederate (self-hosted) or PingOne (cloud-hosted). The setup process differs between the two, so confirm which product your organization uses before you start. If you're using PingFederate, ensure you have administrator-level access to the admin console, typically reached at https://<your-hostname>:9999/pingfederate/app. For PingOne, log into the admin portal and verify that your role includes permission to create connections and manage applications.
PingOne users should confirm their environment is fully provisioned and that an admin role is assigned to their account before starting any OIDC configuration.
Application details you need on hand
Your OIDC client registration requires specific information about your application before you open any configuration screen. Collect these details upfront so you can move through the setup without stopping to look things up:
| Detail | What to provide |
|---|---|
| Redirect URI(s) | The exact URL(s) your app receives the authorization response at |
| Application type | Web app, single-page app (SPA), or native/mobile |
| Required scopes | At minimum openid; add profile, email, or custom scopes as needed |
| Grant type | Authorization Code for user-facing apps, Client Credentials for machine-to-machine |
| Token signing algorithm | RS256 is the OIDC standard and what Ping Identity defaults to |
Your redirect URI must match exactly what you register in Ping Identity, including the protocol, port, and trailing slash. A single character difference causes an authorization failure. Lock down your final redirect URIs before you open the console, not after the fact.
Developer credentials and environment setup
Once your client is registered, you receive a client ID and, depending on your grant type, a client secret. Never hardcode these values in your source files. From day one, use environment variables to keep credentials out of your codebase:
PING_CLIENT_ID=your_client_id_here
PING_CLIENT_SECRET=your_client_secret_here
PING_ISSUER_URL=https://your-ping-domain/as
PING_REDIRECT_URI=https://yourapp.com/callback
You also need your environment's issuer URL, which serves as the base address for your Ping Identity authorization server. This URL drives OIDC discovery and token validation across your entire integration. In PingOne, find it under your environment's Connection settings. In PingFederate, locate it in the OAuth server settings under the base URL field.
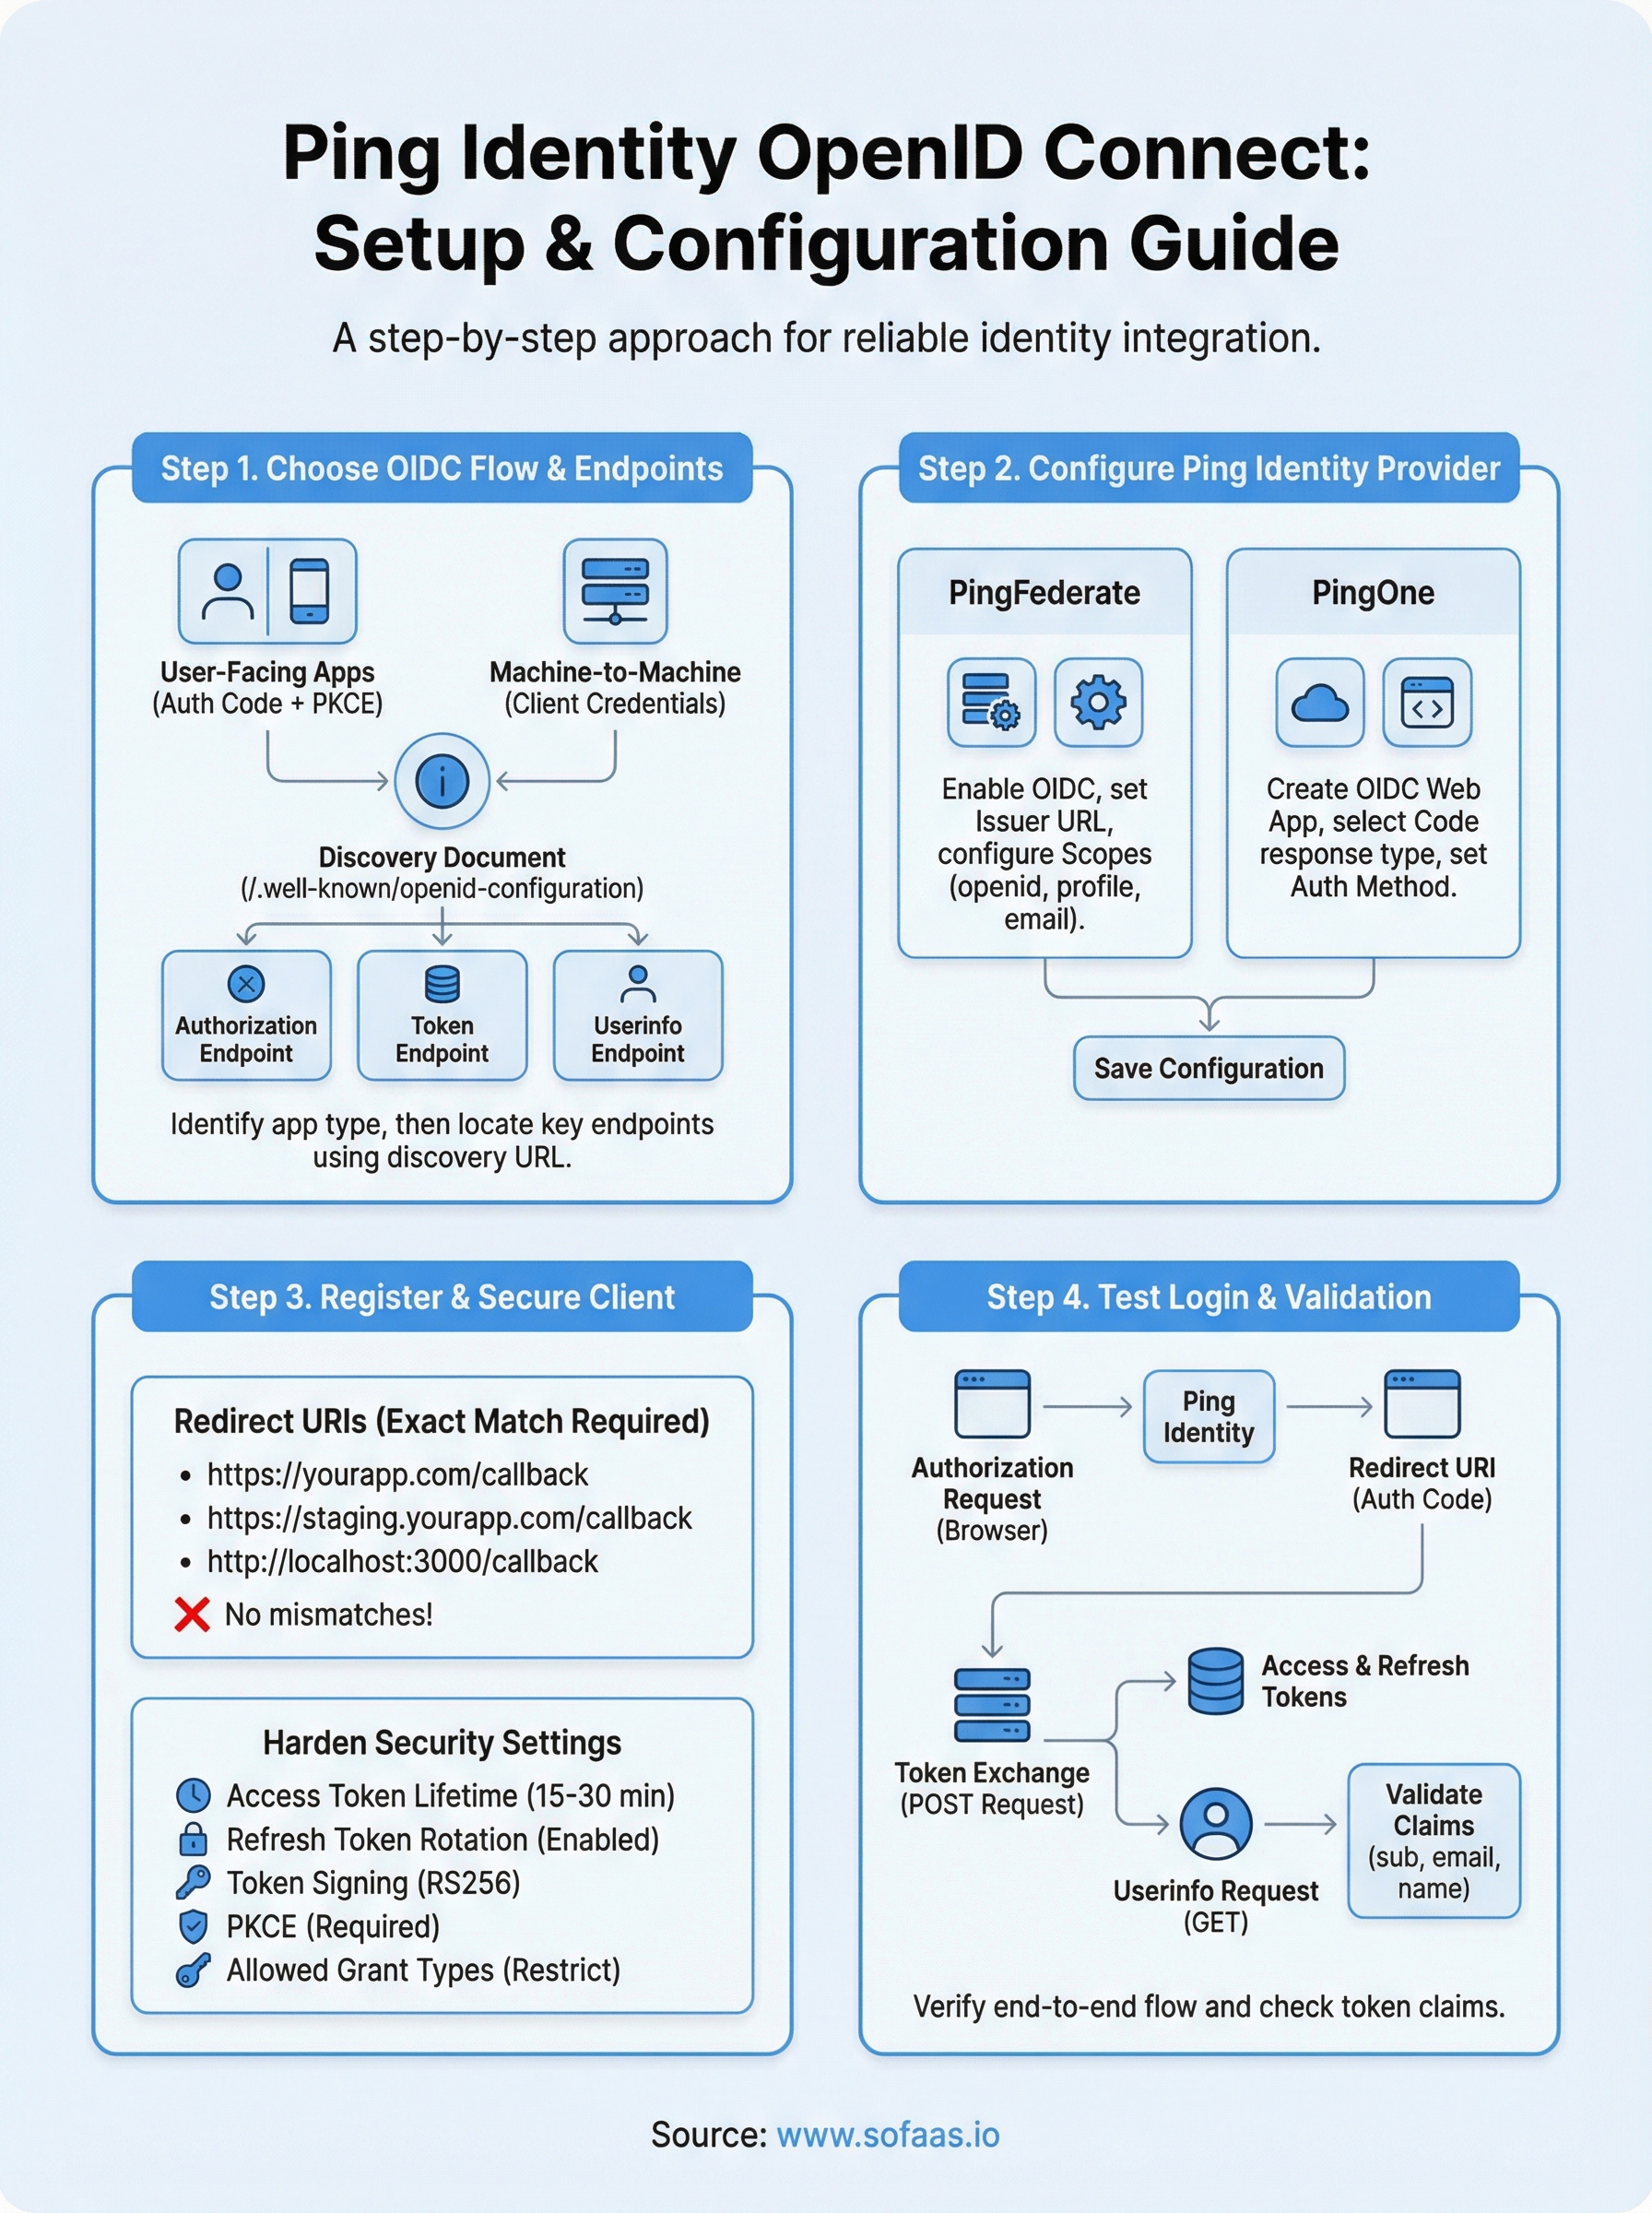
Step 1. Choose your OIDC flow and endpoints
The grant type you select shapes every other decision in your ping identity openid connect configuration. Pick the wrong flow and you'll spend significant time reconfiguring clients and redirects later. Identify your application type first, then match it to the correct OAuth 2.0/OIDC grant type before you open any Ping Identity settings.
Pick the right grant type
Your application type determines which flow you use. Authorization Code with PKCE is the correct choice for user-facing web apps and single-page applications. Use Client Credentials only for server-to-server, machine-to-machine scenarios where no human user is involved. Avoid the Implicit flow entirely; it is deprecated and not recommended by current OAuth 2.0 security best practices.
Use Authorization Code with PKCE for any app that authenticates real users. Client Credentials is strictly for backend service-to-service calls with no user interaction involved.
| Application type | Recommended grant type | User interaction |
|---|---|---|
| Web app (server-side) | Authorization Code + PKCE | Yes |
| Single-page app | Authorization Code + PKCE | Yes |
| Native/mobile app | Authorization Code + PKCE | Yes |
| Backend service | Client Credentials | No |
Locate your discovery endpoints
Ping Identity exposes a discovery document at a standard OIDC well-known URL. This document returns every endpoint address you need without any manual lookup. Retrieve it by appending /.well-known/openid-configuration to your issuer URL:
https://<your-issuer-url>/.well-known/openid-configuration
This document includes your authorization endpoint, token endpoint, userinfo endpoint, and JWKS URI. Pull these values into your environment variables immediately. You will reference them in every subsequent step, so storing them now prevents constant context switching between your Ping Identity console and your codebase during the rest of the configuration process.
Step 2. Configure Ping Identity as the provider
With your grant type and endpoints identified, you're ready to configure Ping Identity as your OIDC provider. The exact steps differ depending on whether you're working in PingFederate or PingOne, so this section covers both paths. Follow the instructions that match your deployment before moving on to client registration.
Configure the authorization server in PingFederate
Open the PingFederate admin console and navigate to Security > OAuth Settings > Authorization Server. Enable OpenID Connect support by checking the OIDC box under Allowed Grant Types. Set your issuer URL to match the value you stored in your environment variables during Step 1.
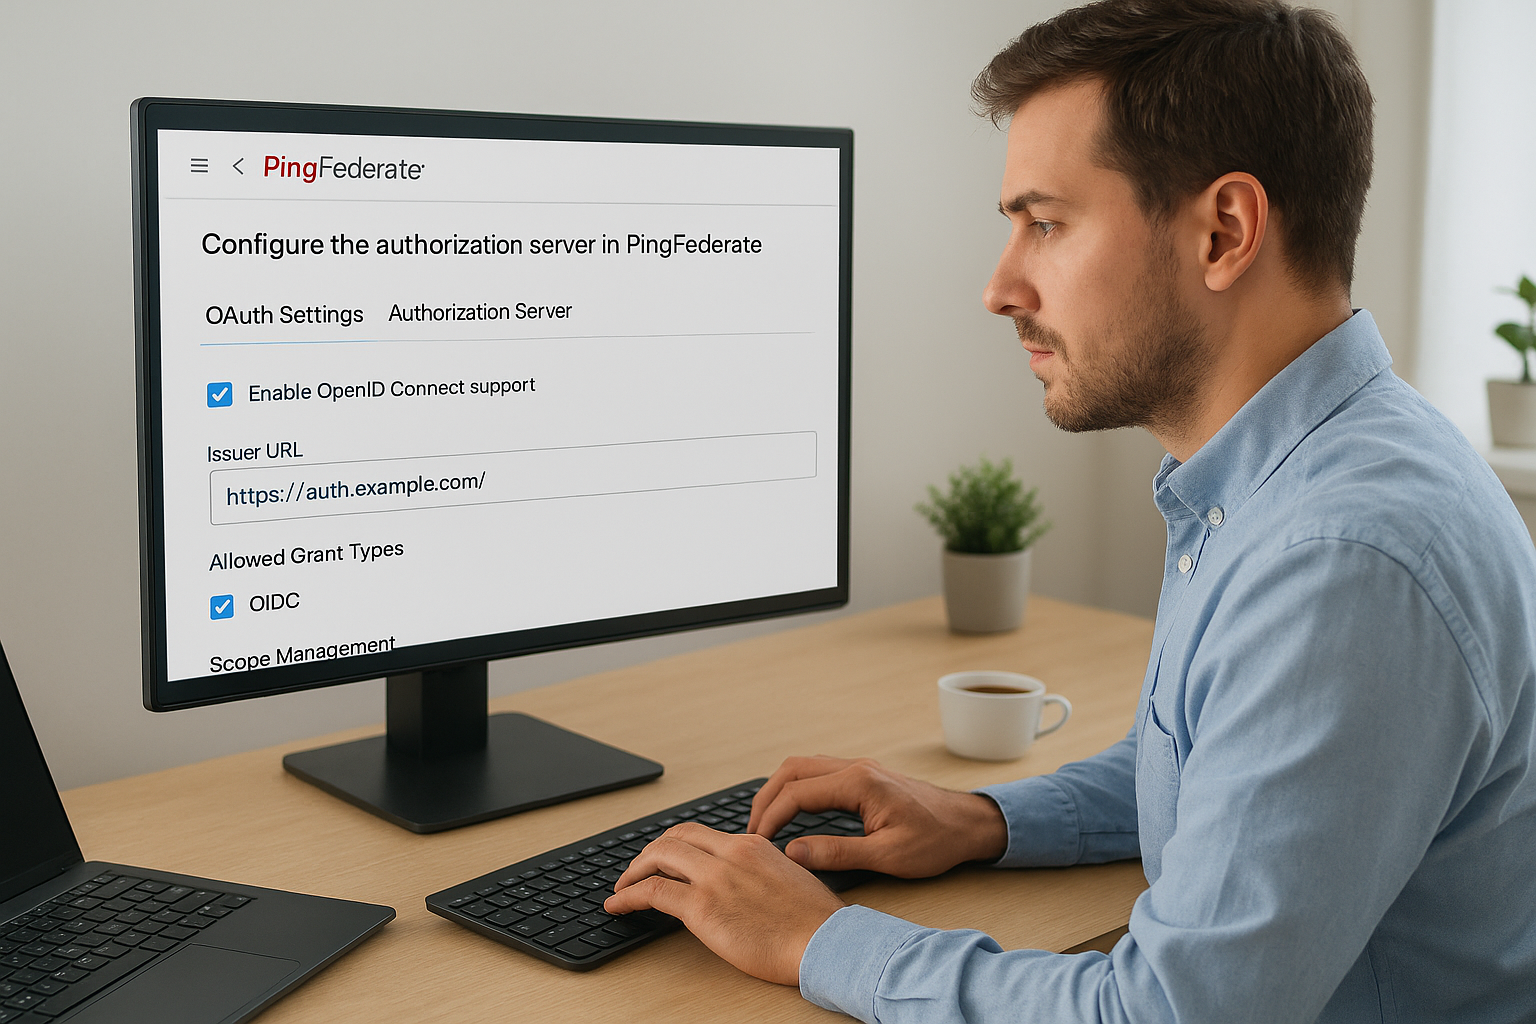
Confirm that your issuer URL in PingFederate exactly matches the value your application uses to build discovery and token requests, because any mismatch breaks OIDC discovery silently.
Next, configure your scope management settings by adding the standard OIDC scopes your application requires:
openid(required for all OIDC flows)profile(returns name, given_name, and family_name claims)email(returns email and email_verified claims)
Save your authorization server settings before moving to client registration.
Configure the application in PingOne
In PingOne, navigate to Connections > Applications and click the plus icon to add a new application. Select OIDC Web App as the application type to configure a ping identity openid connect flow, then give the application a descriptive name that identifies the system it serves. Set the response type to Code, which corresponds to the Authorization Code flow you selected in Step 1.
Set your token endpoint authentication method to Client Secret Basic for server-side apps, or None for SPAs using PKCE. Click Save to generate your client ID and, where applicable, your client secret.
Step 3. Register and secure your OIDC client
With your authorization server configured, your next task is to register your application as an OIDC client and lock down its security settings. This step is where your ping identity openid connect integration becomes concrete, because the client configuration directly controls how tokens are issued, what data is exposed, and which redirect paths are trusted.
Set redirect URIs and allowed origins
Your redirect URI is the single most critical field in your client registration. Ping Identity will reject any authorization response that targets an unregistered URI, so add every URI your application uses across development, staging, and production environments before you save the client record.

For a typical web application, your client registration should include entries like these:
https://yourapp.com/callback
https://staging.yourapp.com/callback
http://localhost:3000/callback
Register all environment-specific redirect URIs upfront. Modifying this list after go-live requires a new deployment and re-verification, which adds avoidable delays.
Harden client security settings
Once your URIs are confirmed, configure the token lifetime and signing settings for your client. In both PingFederate and PingOne, set your access token lifetime to the minimum your application can tolerate, typically 15 to 30 minutes. Refresh tokens carry longer lifetimes and should use rotation policies so each use issues a new token and invalidates the previous one.
Apply these security settings on every client you register:
| Setting | Recommended value |
|---|---|
| Access token lifetime | 15-30 minutes |
| Refresh token rotation | Enabled |
| Token signing algorithm | RS256 |
| PKCE requirement | Required for public clients |
| Allowed grant types | Only what your app actually uses |
Restrict your allowed grant types to only what your application requires. Leaving unused grant types enabled widens your attack surface without adding any functional benefit.
Step 4. Test login, tokens, and userinfo
With your ping identity openid connect client registered and secured, you need to verify that the full login flow works end to end before you ship anything to production. Testing is not optional, and running through each step systematically catches misconfigured redirect URIs, broken token validation, and missing claims before real users encounter them.
Trigger an authorization request
Start by constructing an authorization URL manually and pasting it into a browser. This forces the full login flow without depending on your application code, which isolates any issues to the Ping Identity configuration itself rather than your client implementation.
https://<your-issuer-url>/as/authorization.oauth2?
  response_type=code
  &client_id=YOUR_CLIENT_ID
  &redirect_uri=https://yourapp.com/callback
  &scope=openid%20profile%20email
  &state=random_state_value
  &code_challenge=YOUR_PKCE_CHALLENGE
  &code_challenge_method=S256
If Ping Identity returns an authorization code to your redirect URI, your authorization server and client registration are both working correctly. If you receive an error, check that your redirect URI and client ID match exactly what you registered in Step 3.
A redirect mismatch error at this stage almost always means a trailing slash, port number, or protocol difference between your registered URI and the one in your request.
Validate the token response and userinfo
Exchange your authorization code for tokens by sending a POST request to the token endpoint. Then call the userinfo endpoint using the access token as a Bearer credential to confirm that claims return correctly.
curl -X GET https://<your-issuer-url>/idp/userinfo.openid \
  -H "Authorization: Bearer YOUR_ACCESS_TOKEN"
Confirm that the response includes your expected claims like sub, email, and name. Any missing claim points to a scope or attribute mapping issue in your Ping Identity policy configuration.
Next steps
You now have a complete picture of how Ping Identity OpenID Connect works, from provider configuration through token validation. Follow each step in sequence, verify your authorization flow before touching production, and keep your credentials in environment variables rather than hardcoded anywhere in your codebase.
If your application connects to Electronic Health Records, OIDC is just one piece of the puzzle. SMART on FHIR layers healthcare-specific authorization requirements on top of standard OAuth flows, adding patient consent, launch contexts, and EHR-specific scopes that require additional configuration. Managing all of that alongside your identity setup adds significant complexity to every integration you build.
Launch your SMART on FHIR app without the integration overhead and let SoFaaS handle the OAuth management, EHR connectors, and compliance infrastructure so you can focus on building your application instead of wrestling with healthcare identity protocols.
The Future of Patient Logistics
Exploring the future of all things related to patient logistics, technology and how AI is going to re-shape the way we deliver care.
Thank you! Your submission has been received!
Oops! Something went wrong while submitting the form.