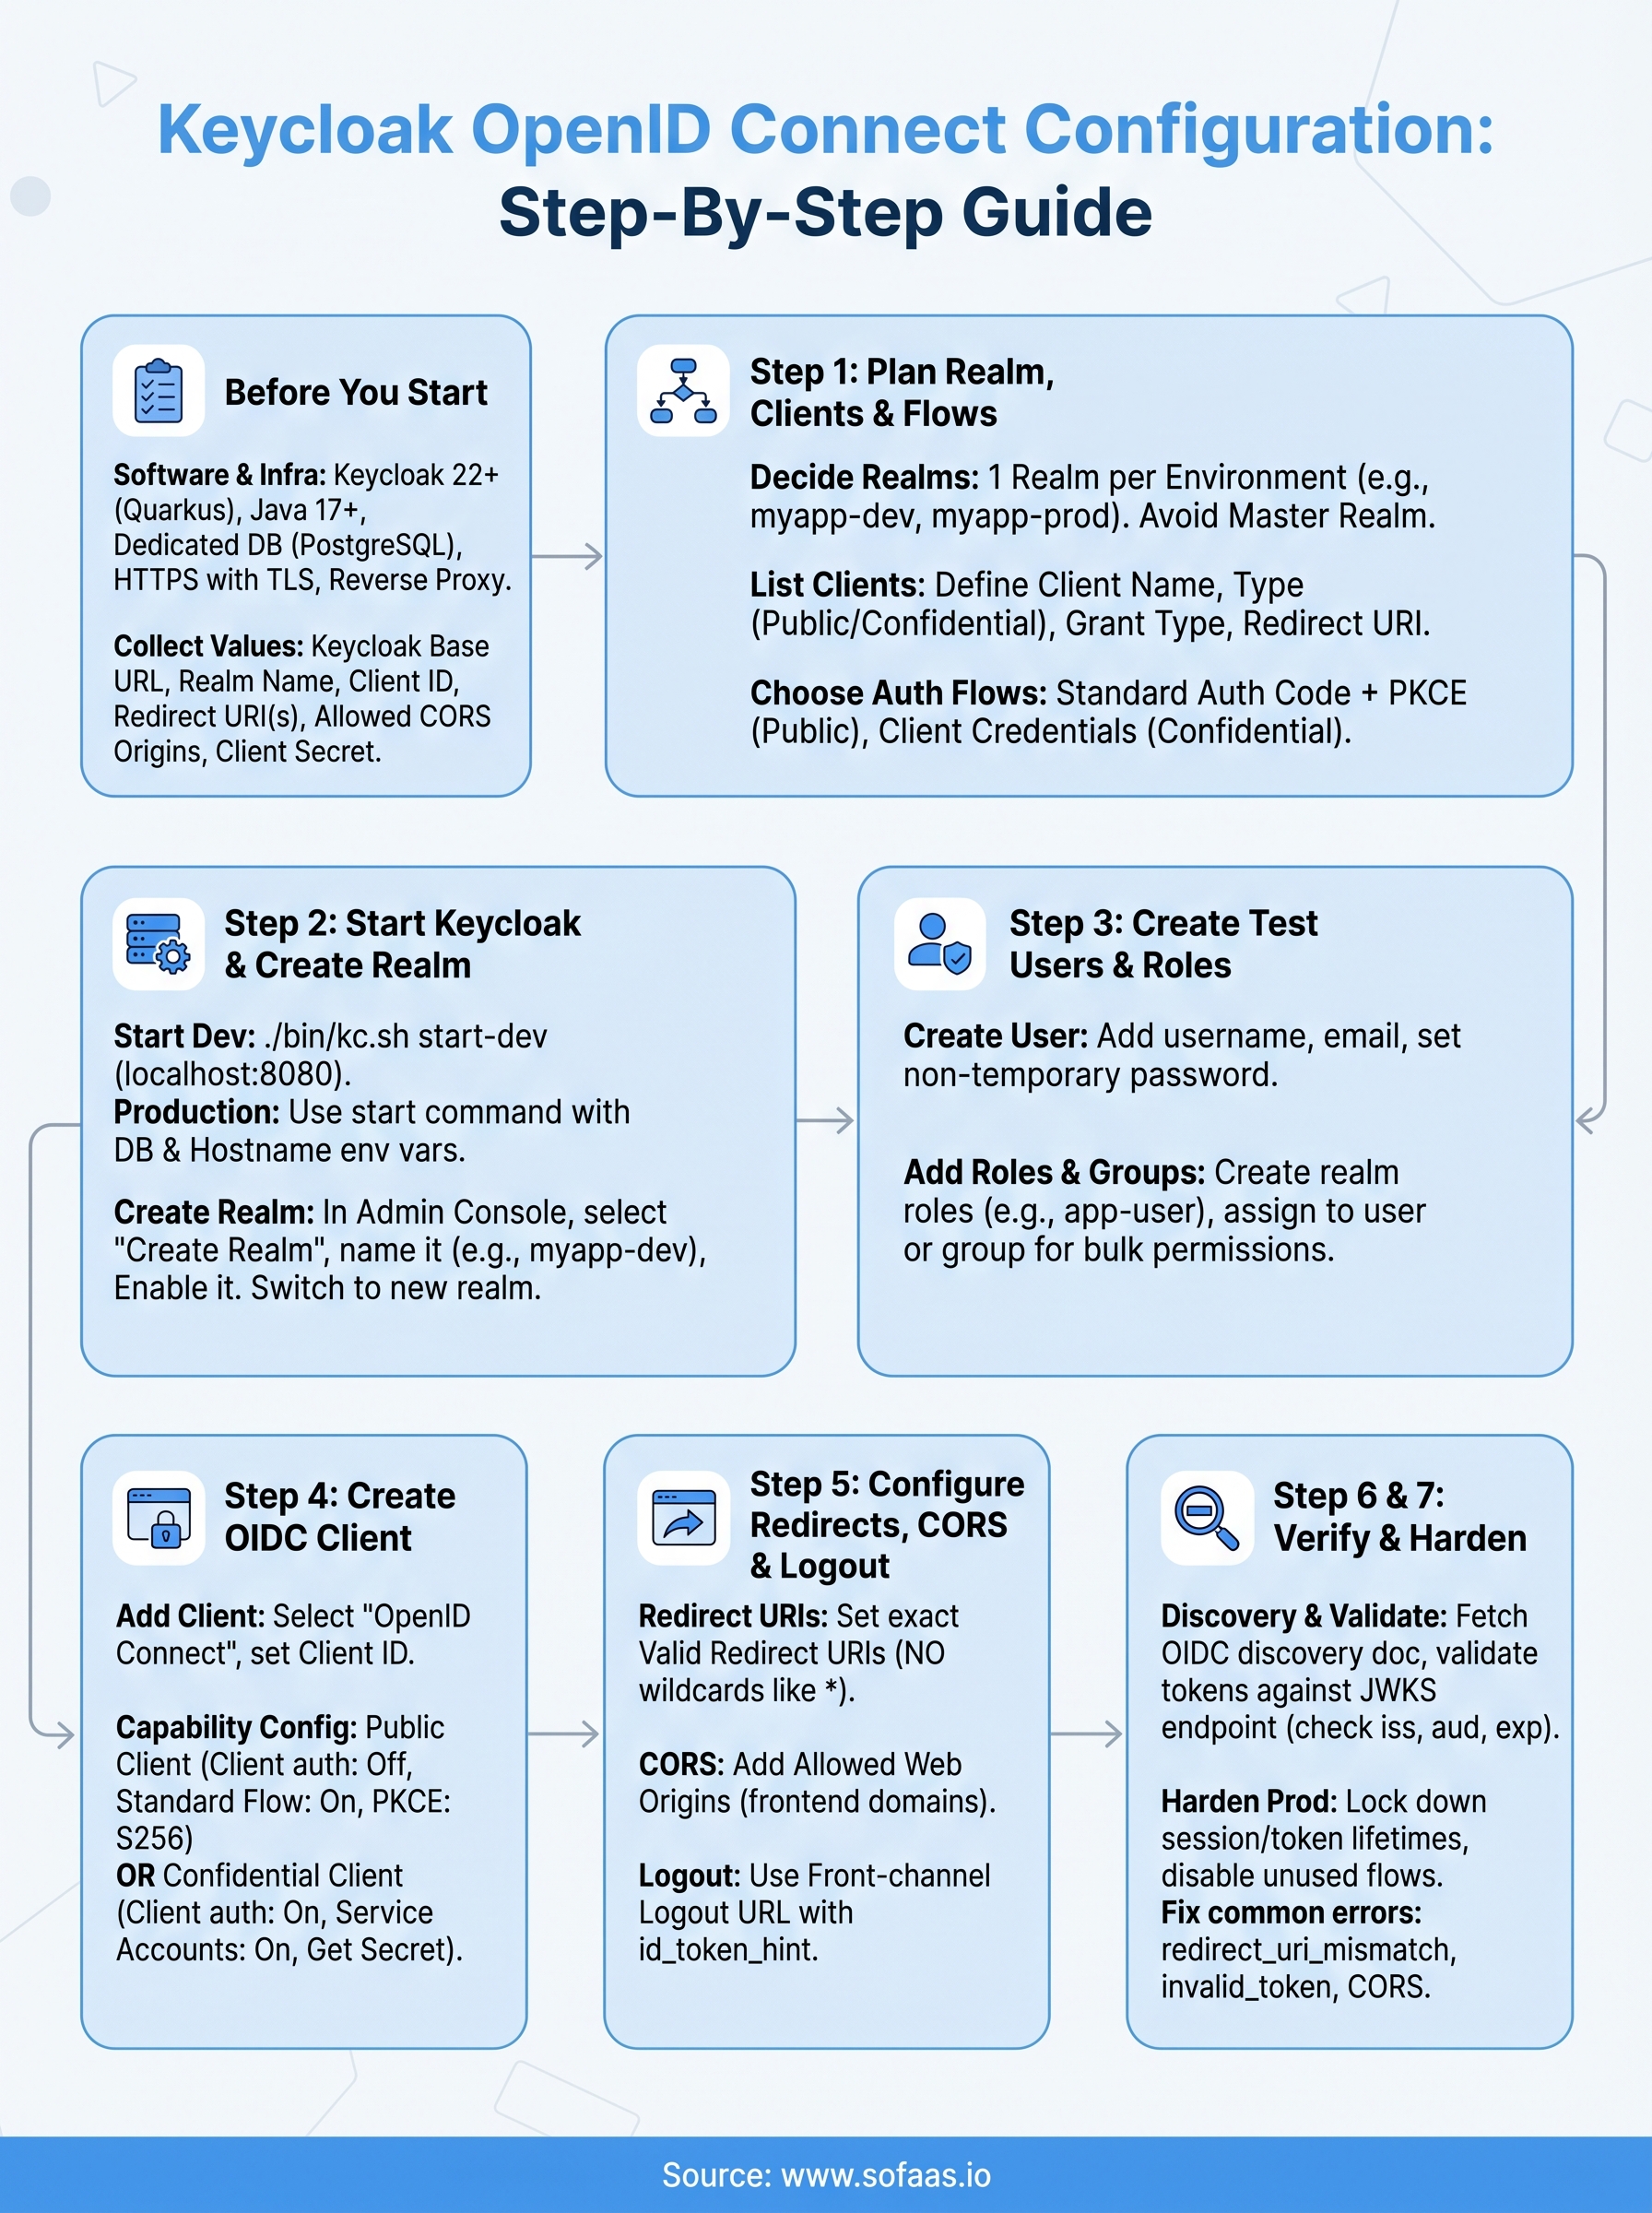
Keycloak OpenID Connect Configuration: Step-By-Step Guide

Keycloak is one of the most widely adopted open-source identity providers, and for good reason, it gives you full control over authentication and authorization without vendor lock-in. But getting Keycloak OpenID Connect configuration right the first time? That's where most teams burn hours reading scattered docs and debugging token flows. Whether you're setting up a new realm, registering an OIDC client, or connecting Keycloak to a downstream application, the details matter more than the concepts.
This guide walks you through each step of configuring Keycloak as an OpenID Connect provider, from initial realm setup to verifying token responses against the OIDC discovery endpoint. You'll get concrete instructions, not abstract overviews, so you can move from zero to a working configuration without guesswork. Every step includes what to click, what to enter, and why it matters for your integration.
At SoFaaS™, we deal with OAuth and OpenID Connect flows daily. Our managed SMART on FHIR platform handles authorization and token management at scale for healthcare applications connecting to EHRs like Epic and Cerner. That work has given us deep, practical knowledge of OIDC configuration across identity providers, including Keycloak. We built this guide from that hands-on experience to help teams, whether in healthcare or any other sector, get their OIDC setup right and move on to building what actually matters.
What you need before you configure OIDC in Keycloak
Before you touch a single Keycloak screen, you need to make sure your environment and your knowledge are both in order. Jumping straight into Keycloak OpenID Connect configuration without the right inputs is the fastest way to create a broken setup that's hard to debug later. This section covers every prerequisite so you start from a solid foundation.
Software and infrastructure requirements
You need a running Keycloak instance before anything else. As of Keycloak 22+, the server runs on Quarkus, so the startup commands and configuration files differ from the older WildFly-based versions. If you're running Keycloak locally for testing, Java 17 or higher is required. For production, you'll want a container runtime like Docker or a Kubernetes cluster, and you should plan for a dedicated database such as PostgreSQL rather than relying on the embedded H2 database, which Keycloak explicitly marks as unsuitable for production use.
Never use the H2 embedded database in a production Keycloak deployment. It does not support clustering, and any data you store there is at risk the moment you restart the server.
Your network setup also matters. Keycloak needs to be accessible over HTTPS in production, which means you need a valid TLS certificate and a reverse proxy or load balancer in front of it. NGINX or a cloud load balancer both work well here. For local development, HTTP on localhost is acceptable, but you still need to set KC_HOSTNAME and KC_PROXY environment variables correctly before you go live, or token validation will fail once you move to a real domain.
Configuration values to collect before you start
Gather these values before you open the admin console. Hunting for them mid-configuration breaks your focus and leads to typos in critical fields:
| Value | Where to find it |
|---|---|
| Keycloak base URL | Your server address, e.g., https://auth.example.com |
| Realm name | Decided by you during planning |
| Client ID | Typically your application name |
| Redirect URI(s) | Your application's callback URL(s) |
| Allowed CORS origins | Your frontend domain(s) |
| Client secret | Generated by Keycloak after client creation |
Having these values ready means you won't need to pause mid-configuration and switch back and forth between your application code and the Keycloak admin console to look things up.
Understanding your application's OIDC role
Your application will act as either a public client or a confidential client, and this distinction drives several downstream decisions in Keycloak. A public client, such as a single-page app or a mobile app, cannot securely store a secret, so Keycloak will require PKCE (Proof Key for Code Exchange) to protect the Authorization Code flow. A confidential client, such as a server-side web application, can store a secret and authenticates directly with the token endpoint using that secret.
Knowing your application's role before you start means you won't configure the wrong client type and then spend time diagnosing why tokens are being rejected. If your app runs in a browser without a backend, plan for a public client with PKCE. If your app runs on a server and needs to call other services on its own behalf, plan for the Client Credentials flow with a confidential client.
Step 1. Plan your realm, clients, and flows
Skipping the planning step is the single most common reason teams end up rebuilding their Keycloak OpenID Connect configuration from scratch two weeks later. Before you create anything in the admin console, take 15 minutes to draw out your realm boundaries, client list, and authentication flows on paper or a whiteboard. That map will save you from configuration choices that are painful to undo, like merging user pools that should have been separate.
Decide how many realms you need
Keycloak uses realms as isolated tenants, each with its own users, clients, roles, and identity provider settings. The built-in master realm is for Keycloak administration only, so you should never register your application clients there. Create at least one dedicated realm for your application environment.
A common pattern is to create one realm per environment:
myapp-devfor local and development testingmyapp-stagingfor pre-production verificationmyapp-prodfor live users
This keeps your token issuers separate and prevents a misconfigured dev client from interfering with production traffic.
Never register application clients in the
masterrealm. Keep it strictly for Keycloak admin access.
List every client and its grant type
Each application or service that needs tokens from Keycloak is a separate client. Before you open the admin console, write down every client you'll need along with the grant type it will use. This prevents you from mixing up confidential and public client settings mid-setup.
Use a simple table like this as your reference:
| Client name | Type | Grant type | Redirect URI |
|---|---|---|---|
frontend-spa |
Public | Authorization Code + PKCE | https://app.example.com/callback |
backend-api |
Confidential | Client Credentials | N/A |
mobile-app |
Public | Authorization Code + PKCE | com.example.app:/callback |
Choose your authentication flows
Standard Authorization Code flow with PKCE covers most use cases. Reserve Client Credentials flow for machine-to-machine calls where no user is involved. Having this decided upfront means you configure the right settings the first time without second-guessing yourself later.
Step 2. Start Keycloak and create a realm
With your planning done, it's time to get Keycloak running and create the realm that will house your OpenID Connect clients and users. This step covers starting Keycloak locally for testing and walking through realm creation in the admin console so you have a clean, isolated environment ready before you configure anything else.
Start Keycloak for the first time
Run Keycloak in development mode to get moving quickly. From your Keycloak installation directory, use this command:
./bin/kc.sh start-dev
This starts Keycloak on http://localhost:8080 with an embedded H2 database. The first time you visit that URL, Keycloak prompts you to create an initial admin account. Enter a username and a strong password, then click "Create". After that, log in at http://localhost:8080/admin with those credentials to reach the admin console.
For production, replace
start-devwithstartand supply your database connection, hostname, and TLS settings via environment variables before exposing the server to any traffic.
Create a dedicated realm
Once you're logged into the admin console, look at the top-left corner where it shows "master". Click that dropdown and select "Create Realm". You'll see a simple form asking for a realm name and an optional JSON import.
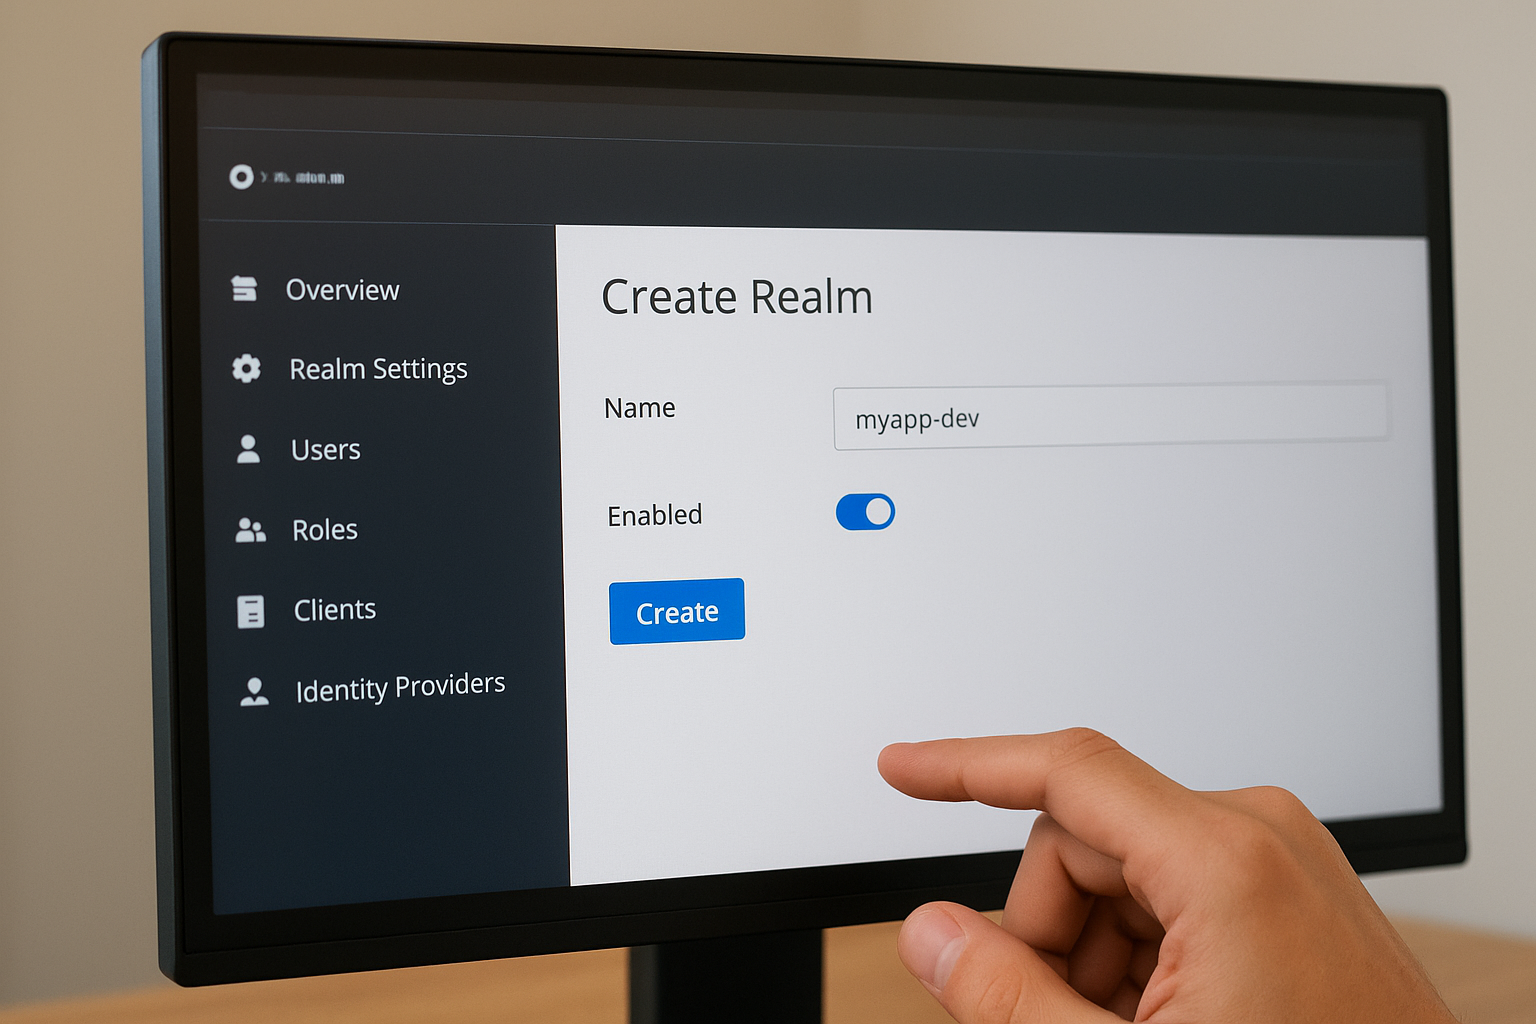
Fill in the form using this reference:
| Field | Value |
|---|---|
| Realm name | myapp-dev (match your naming convention from Step 1) |
| Enabled | On |
Click "Create" and Keycloak switches your working context into the new realm automatically. You're now inside an isolated tenant that holds its own users, clients, roles, and session settings, completely separate from the master realm.
Your entire Keycloak OpenID Connect configuration lives within this realm, so always confirm the realm name displayed in the top-left corner before making changes. Editing settings in the wrong realm is a common time-waster because clients and users won't appear where you expect them when you switch context later.
Step 3. Create users, roles, and groups for testing
Before you register a single client, you need at least one test user in your realm so you can actually verify that token flows work end to end. Creating users, roles, and groups now also lets you confirm that role claims appear correctly in the tokens your application receives, which saves you from debugging claim mapping issues after your client is already configured.
Create a test user
In the admin console, make sure you're in your new realm, then navigate to Users in the left sidebar and click "Create new user". Fill in the following fields:
| Field | Value |
|---|---|
| Username | testuser |
testuser@example.com |
|
| First name | Test |
| Last name | User |
| Email verified | On |
Click "Create", then go to the "Credentials" tab on the user detail page. Click "Set password", enter a temporary password, and toggle "Temporary" to off so the user won't be forced to reset it on first login. This gives you a stable test account you can use throughout the rest of this guide.
Add roles and assign them
Roles let you control what a user can access inside your Keycloak OpenID Connect configuration. Navigate to Realm roles in the sidebar and click "Create role". Add at least two roles, for example app-user and app-admin, so you can test that your application correctly distinguishes between different permission levels in token claims.
Always create realm-level roles for permissions that span multiple clients, and use client-level roles only for permissions specific to one application.
After creating the roles, go back to your test user, open the "Role mapping" tab, and assign app-user to the account.
Organize users into groups
Groups give you a way to assign roles and attributes in bulk, which matters once your application scales beyond a handful of users. Navigate to Groups, create a group called testers, and add your test user to it. Then assign the app-user role to the group directly so any future user you add to testers inherits the role automatically without manual assignment.
Step 4. Create an OpenID Connect client in Keycloak
With your realm, roles, and test user in place, you're ready to register the application that will request tokens. This is the core of your Keycloak OpenID Connect configuration, and getting the client settings right here determines whether your authorization flows succeed or fail before a single redirect ever happens.
Open the Clients menu and add a new client
In the admin console, confirm you're inside your target realm, then click "Clients" in the left sidebar. Click "Create client" to open the creation wizard. Keycloak walks you through three screens: General Settings, Capability Config, and Login Settings. Fill in the General Settings screen using this reference:
| Field | Value |
|---|---|
| Client type | OpenID Connect |
| Client ID | frontend-spa (or your app name from Step 1) |
| Name | A human-readable label for the console |
| Description | Optional, but useful for multi-team environments |
Click "Next" to move to the Capability Config screen.
Set the access type and authentication method
The Capability Config screen is where you decide whether this client is confidential or public, which drives every security decision downstream. For a browser-based single-page app, set "Client authentication" to off. This marks it as a public client. Then enable "Standard flow" to activate the Authorization Code flow, and enable "PKCE" by setting the PKCE challenge method to S256 under the Advanced tab after creation.
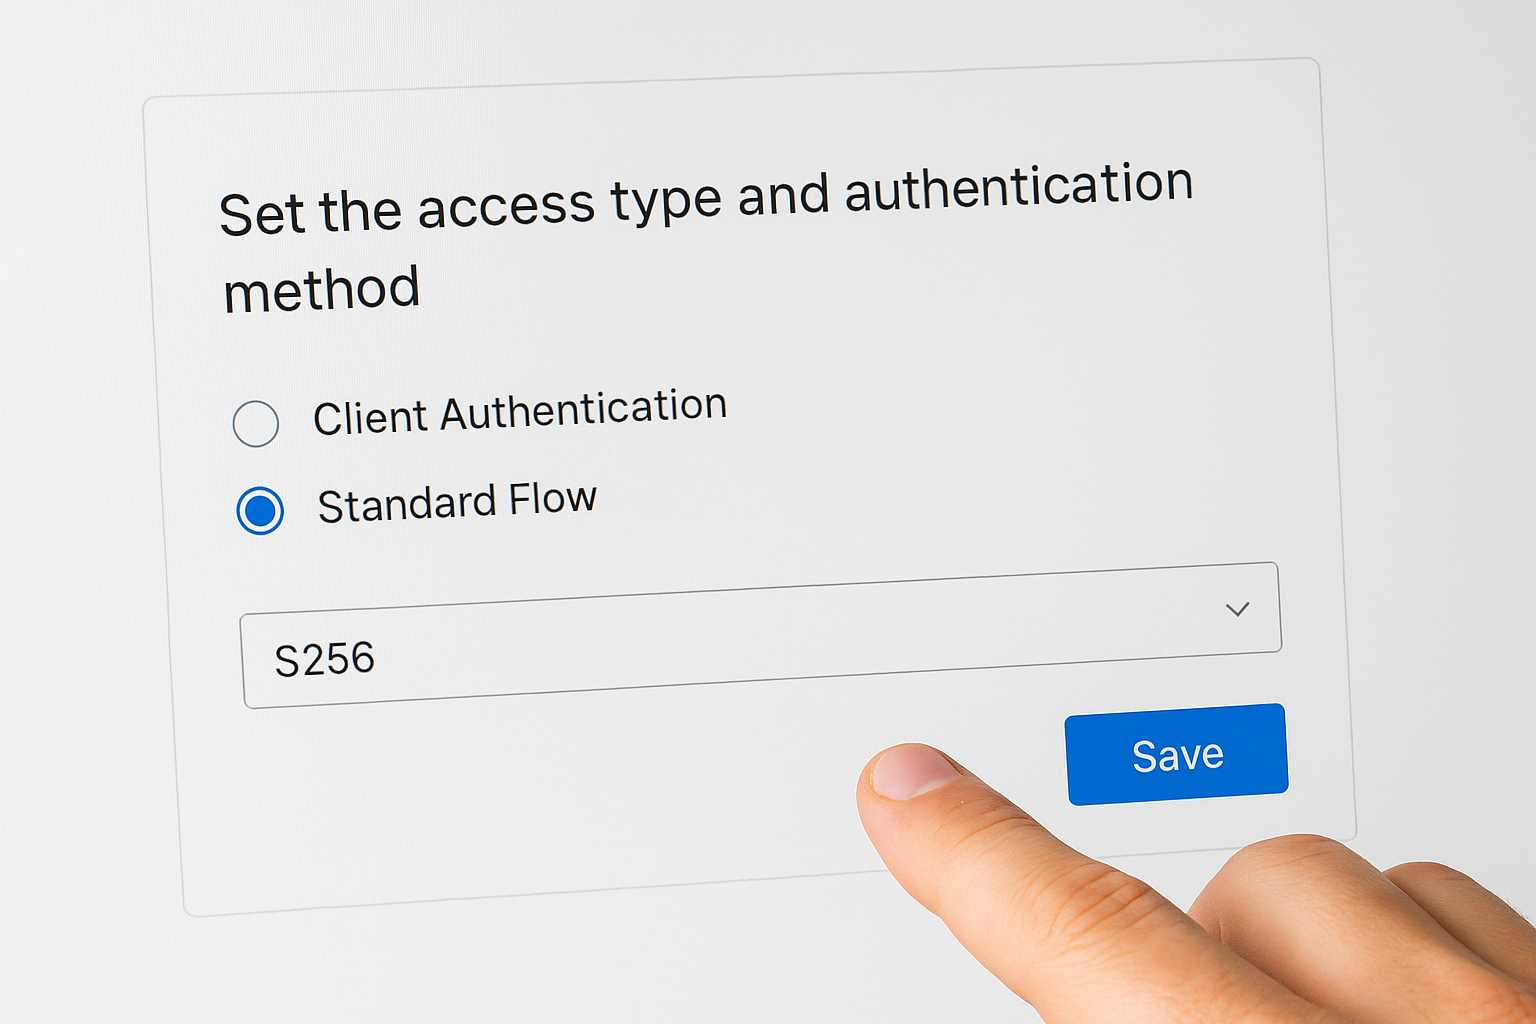
If your application runs on a server and needs to call APIs on its own behalf, turn "Client authentication" on and enable "Service accounts roles" instead of Standard flow.
For a confidential server-side client, enabling "Client authentication" on makes Keycloak generate a client secret automatically. You'll retrieve that secret from the "Credentials" tab on the client detail page after you save.
Save the client and retrieve credentials
Click "Save" to finish creating the client. Keycloak lands you on the client detail page. If you created a confidential client, open the "Credentials" tab immediately and copy the client secret into your application's environment configuration before you do anything else. Treat this value like a password and never commit it to source control.
Step 5. Configure redirect URIs, CORS, and logout
Redirect URIs, CORS settings, and logout URLs are three areas where small mistakes cause big failures. A single trailing slash difference or a missing origin will block your entire authorization flow, so this step of your Keycloak OpenID Connect configuration deserves precise attention.
Set valid redirect URIs and post-logout redirect URIs
Keycloak validates every redirect against the list of valid redirect URIs you register on the client. If the URI in your authorization request does not match exactly, Keycloak rejects the request before any login page appears. Open your client in the admin console, scroll to the "Access settings" section, and fill in the redirect URI fields using this reference:

| Field | Example value |
|---|---|
| Valid redirect URIs | https://app.example.com/callback |
| Valid post-logout redirect URIs | https://app.example.com/logout-success |
| Web origins | https://app.example.com |
Avoid using wildcard redirect URIs like https://app.example.com/* in production. Wildcards widen the attack surface and allow open redirect vulnerabilities that expose your users' tokens to unauthorized parties.
Never use a bare wildcard
*as a valid redirect URI in any environment outside of isolated local testing.
Configure CORS allowed origins
The "Web origins" field controls which origins Keycloak includes in its CORS response headers when your frontend calls the token endpoint directly. Enter each frontend domain you expect to make requests from. If you add a valid redirect URI and leave "Web origins" blank, Keycloak will automatically permit the origins from those redirect URIs, but it is safer to set this explicitly so the behavior stays predictable when your redirect list changes.
Handle logout correctly
Keycloak supports two logout mechanisms: front-channel logout, which redirects the browser to Keycloak's logout endpoint, and back-channel logout, which sends a server-to-server request to your application. For most browser-based apps, use the front-channel approach by directing users to:
https://auth.example.com/realms/myapp-dev/protocol/openid-connect/logout
  ?post_logout_redirect_uri=https://app.example.com/logout-success
  &id_token_hint=<id_token>
Always include the id_token_hint parameter. Without it, Keycloak may skip the session termination step and leave the user's SSO session active even after they click "Sign out."
Step 6. Use discovery endpoints and validate tokens
Every working Keycloak OpenID Connect configuration exposes a discovery endpoint automatically, and this endpoint is your single source of truth for every URL your application needs. Before you hardcode any endpoint into your application config, pull the discovery document first to confirm Keycloak is serving the right values for your realm.
Fetch the OIDC discovery document
Keycloak publishes a well-known discovery document at a predictable path for every realm you create. Open a browser or run a curl command against this URL, substituting your own base URL and realm name:
curl https://auth.example.com/realms/myapp-dev/.well-known/openid-configuration
The response is a JSON document that lists every endpoint your application needs, including authorization_endpoint, token_endpoint, userinfo_endpoint, jwks_uri, and end_session_endpoint. Copy the value of each field directly into your application's OIDC client library configuration rather than constructing URLs by hand. Hardcoded URLs break silently when you upgrade Keycloak or move to a new domain, but a client that reads from the discovery document adapts automatically.
Bookmark the discovery endpoint URL for your realm and check it first whenever a token flow stops working. Keycloak may have restarted or changed its routing config, and the discovery document confirms in seconds whether the server is reachable and serving the expected values.
Validate tokens against the JWKS endpoint
Once your application receives an ID token or access token from Keycloak, it must verify the signature before trusting any claim inside the token. Keycloak signs tokens with RS256 by default, and it publishes the matching public keys at the jwks_uri from the discovery document. Point your token validation library at that URI so it fetches the current signing keys automatically.
Use a tool like jwt.io or the jose library to decode and inspect a token manually during testing. Paste the raw token and confirm that the iss claim matches your realm URL exactly, the aud claim contains your client ID, and the exp timestamp has not passed. These three checks catch the most common token rejection errors before you ever touch application code.
Step 7. Harden for production and fix common errors
A working Keycloak OpenID Connect configuration in a test environment is not automatically safe in production. Before you expose your realm to real users, you need to tighten several default settings that Keycloak ships with permissive values on purpose, because those defaults prioritize convenience over security.
Lock down token lifetimes and session settings
Keycloak's default access token lifespan is 5 minutes, which is reasonable, but its SSO session idle timeout defaults to 30 minutes and the session max lifespan defaults to 10 hours. Those values are far too generous for most production applications handling sensitive data. Navigate to your realm's "Sessions" settings under Realm Settings and reduce the SSO session idle to match your application's actual usage pattern. For most authenticated web apps, 15 minutes of idle time before session expiry strikes a practical balance between security and user experience.
Always set token lifetimes explicitly in your realm settings rather than relying on Keycloak's defaults. Defaults change between major versions, and your application should not inherit unexpected behavior from an upgrade.
Also confirm that you have disabled the "implicit flow" on every client that does not specifically require it. Open each client's Capability Config tab and verify that only the flows your application actually uses are enabled. Unused grant types widen your attack surface without providing any benefit.
Fix the most common configuration errors
Three errors account for the majority of broken setups you will encounter after your initial configuration. Knowing the symptom and the fix lets you resolve them in minutes instead of hours:
| Symptom | Cause | Fix |
|---|---|---|
redirect_uri_mismatch error |
Redirect URI in the request does not match the registered list exactly | Copy the exact URI from your app's OIDC library config and paste it into the Keycloak client settings |
invalid_token on verification |
iss claim does not match your realm URL |
Confirm your Keycloak hostname setting matches the URL clients use to reach the server |
| CORS error on token endpoint call | Web origins field is empty or missing your frontend domain | Add your frontend origin explicitly under the client's Access Settings |
Fixing these three issues resolves the overwhelming majority of failed authorization code flows teams run into when moving from local testing to a real deployment.
Next steps
You now have a complete Keycloak OpenID Connect configuration running, from realm creation and client registration through token validation and production hardening. Each step builds on the last, so if something breaks, trace back through the checklist: verify your redirect URIs, check the discovery endpoint, and confirm your token lifetimes match your security requirements.
From here, the natural next area to explore is token introspection and fine-grained authorization, where Keycloak evaluates resource permissions at runtime rather than relying solely on roles baked into the token. Consider reviewing Keycloak's identity brokering features if your users need to authenticate through an external provider like Google or an enterprise SAML identity provider.
If your work involves connecting healthcare applications to EHRs like Epic or Cerner, SMART on FHIR authorization adds another layer on top of standard OIDC that requires specialized handling. See how SoFaaS manages that complexity for you so your team can skip months of integration work and focus on building the application itself.
The Future of Patient Logistics
Exploring the future of all things related to patient logistics, technology and how AI is going to re-shape the way we deliver care.
Thank you! Your submission has been received!
Oops! Something went wrong while submitting the form.