HAPI FHIR Terminology Server: Setup, Loading, And Ops Guide

Every healthcare application that reads or writes clinical data eventually hits the same wall: terminology. SNOMED CT, LOINC, ICD-10, RxNorm, these code systems are the backbone of interoperable health data, and managing them requires a dedicated service. A HAPI FHIR terminology server gives you exactly that: an open-source, FHIR-native engine for validating, expanding, and translating healthcare codes at scale.
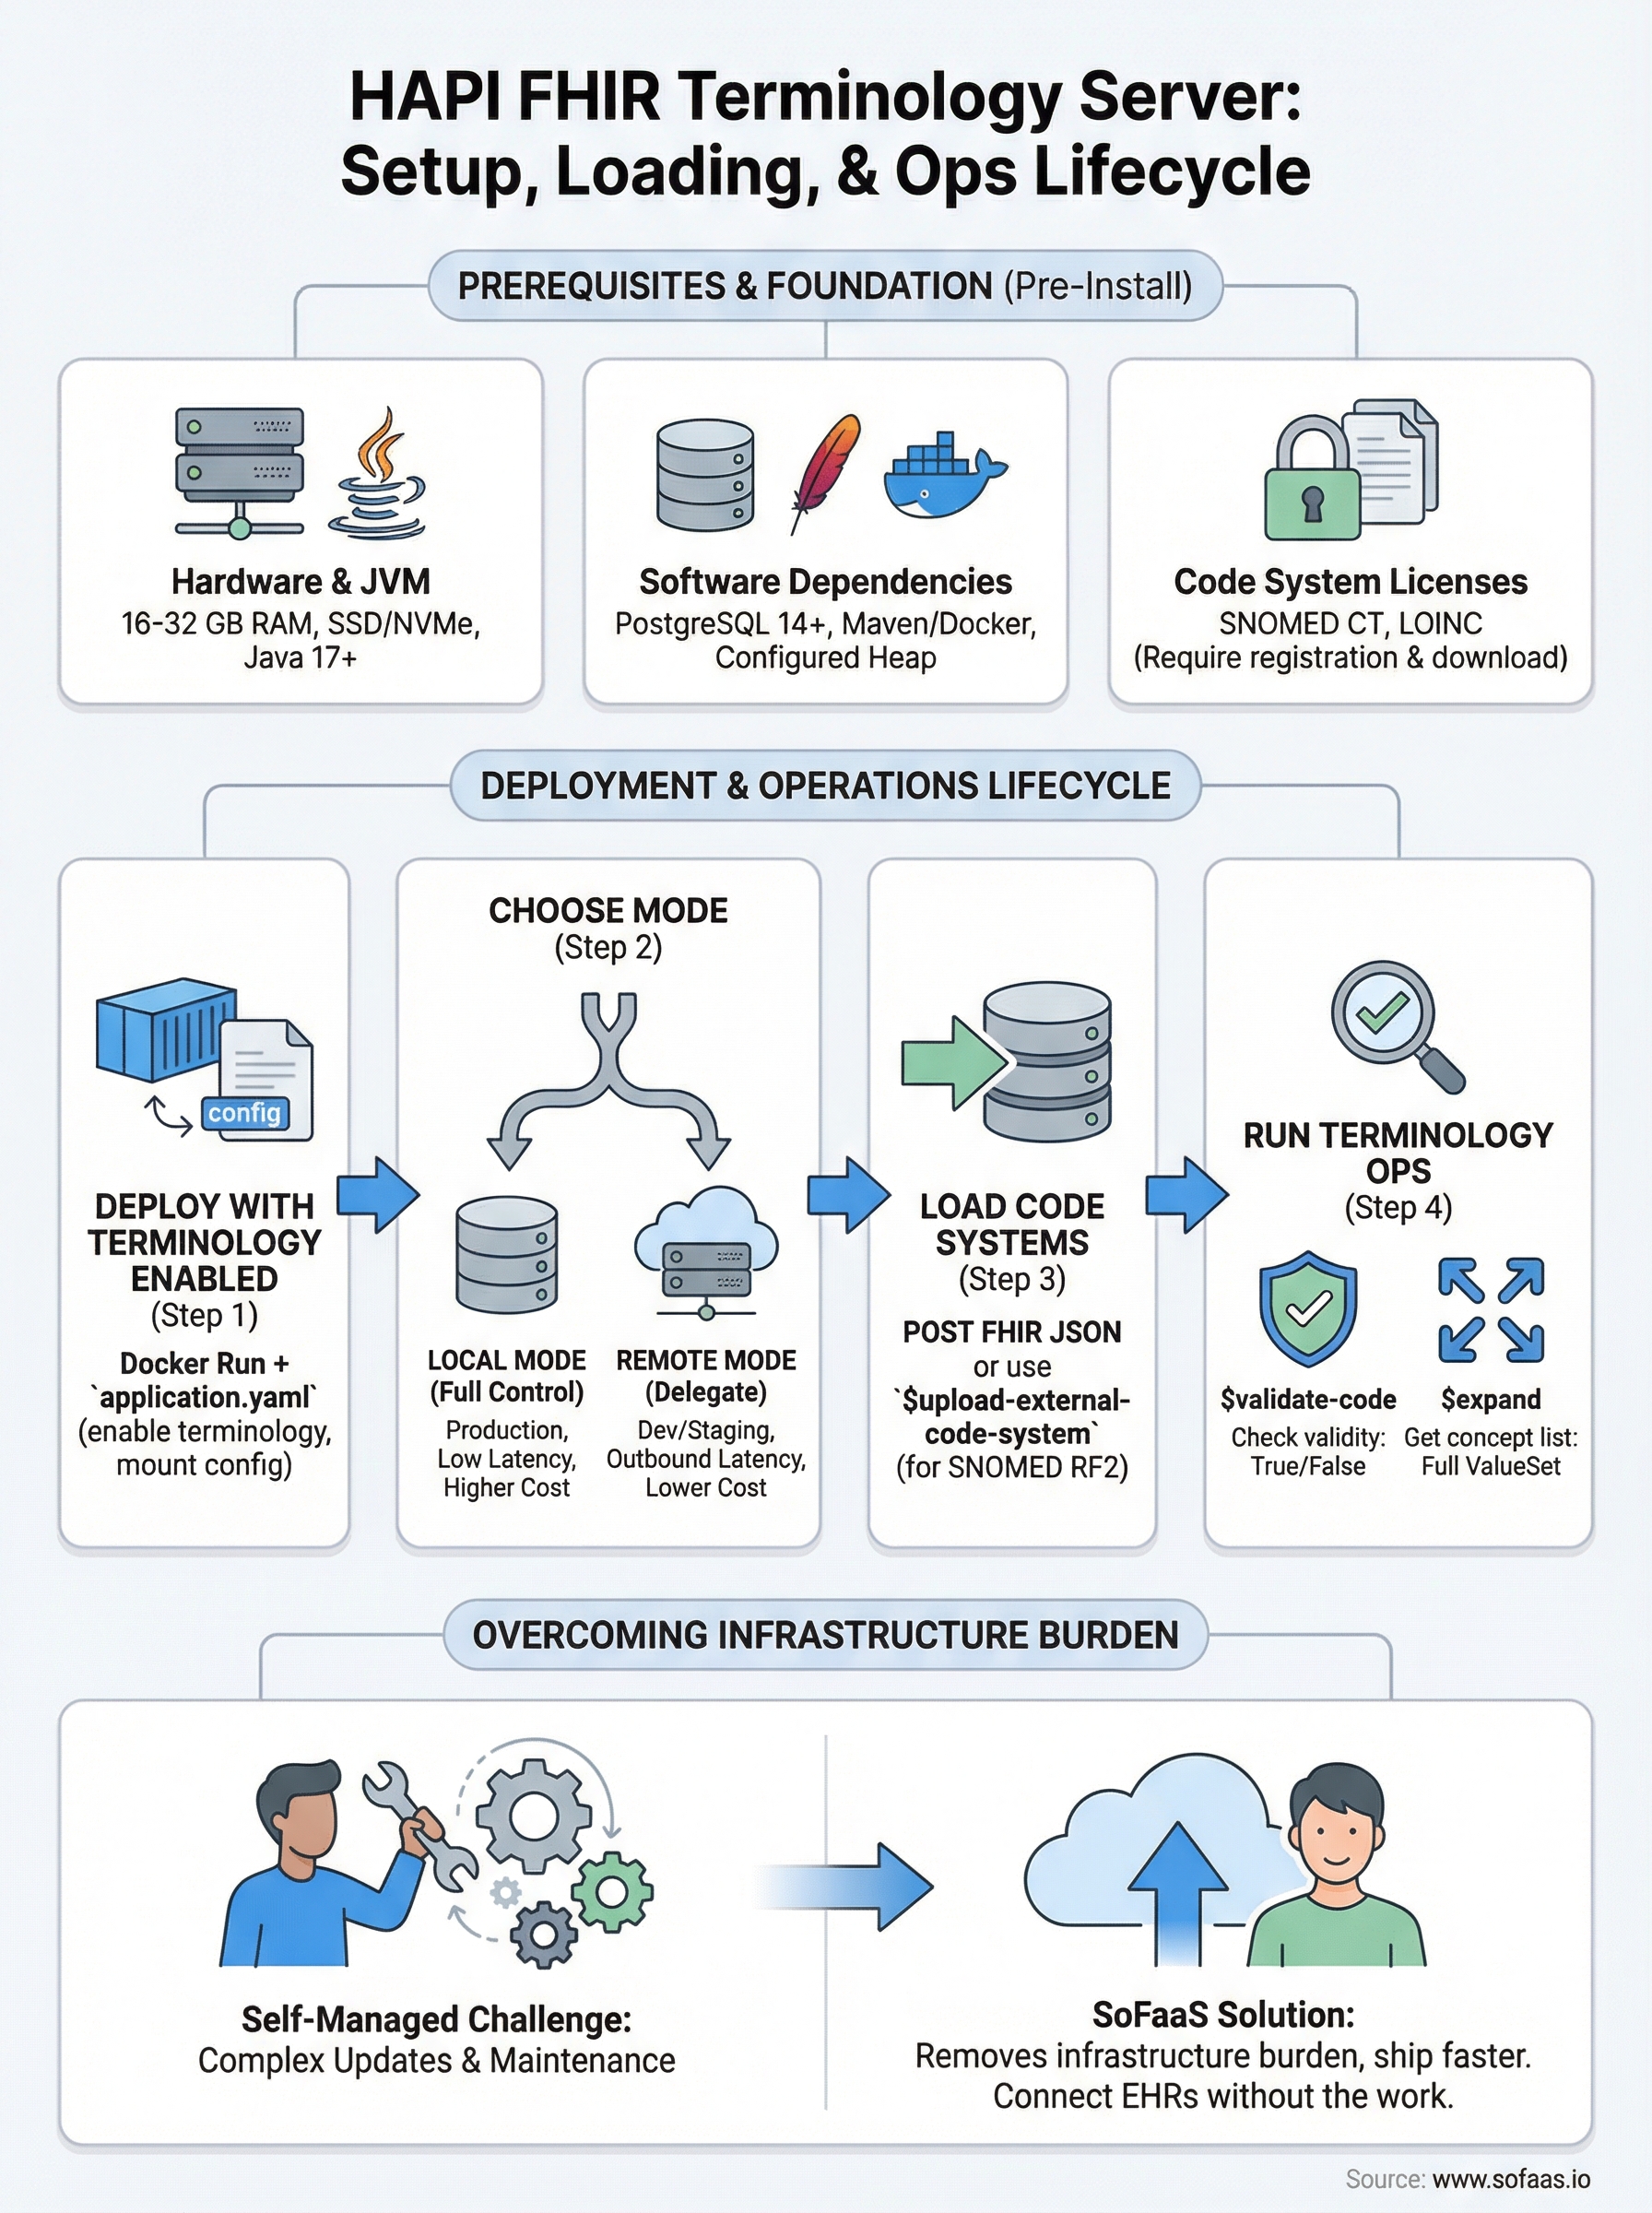
But getting one running in production is a different story. You need to load massive code system files, tune database performance, handle updates without downtime, and make sure your terminology operations actually return correct results. The documentation exists, but it's scattered, and the gap between "Hello World" and production-ready deployment is wider than most teams expect. That gap is something we understand well at SoFaaS, where our entire platform is built around removing the infrastructure burden from healthcare integration so teams can ship faster.
This guide walks you through the full lifecycle: installing HAPI FHIR as a terminology server, loading standard code systems like SNOMED CT and LOINC, configuring $validate-code and $expand operations, and keeping everything stable in production. Whether you're standing up your first instance or hardening an existing one, you'll leave with a clear, repeatable process, no guesswork required.
What you need to run HAPI terminology services
Before you install anything, you need a clear picture of what HAPI FHIR actually requires to run terminology operations reliably. A HAPI FHIR terminology server is not a lightweight service. Loading SNOMED CT alone can push your database past 500 million rows, and validation queries hit those tables on every request. Getting the infrastructure right before you deploy saves you from painful re-architecture six months down the road.
Hardware and JVM requirements
Terminology workloads are memory and I/O intensive, not CPU intensive, so allocate resources accordingly. A minimum production setup should have 16 GB of RAM dedicated to the JVM heap, with 32 GB preferred if you plan to load both SNOMED CT and LOINC simultaneously. Disk throughput matters more than raw storage size because HAPI reads concept graphs repeatedly during expansion operations, so use SSDs rather than spinning disks.
| Resource | Minimum | Recommended |
|---|---|---|
| JVM Heap | 8 GB | 16-32 GB |
| Disk Type | SSD | NVMe SSD |
| Disk Space | 100 GB | 500 GB |
| CPU Cores | 4 | 8+ |
Size your JVM heap at 16 GB or more if you load SNOMED CT in production. Undersizing memory is the most common reason terminology operations time out or return incomplete results.
Software dependencies
Your server requires Java 17 or later and a supported relational database. HAPI works with PostgreSQL, MySQL, and Microsoft SQL Server, but PostgreSQL is the most tested option and performs best with large terminology datasets. You also need Maven or Docker to build or pull the HAPI FHIR JPA server image before deployment.
Core dependencies to install before you begin:
- Java: OpenJDK 17+
- Database: PostgreSQL 14+ (recommended), MySQL 8+, or MSSQL 2019+
- Build tool: Maven 3.8+ or Docker 20.10+
- JVM flags: Configure heap size via
-Xmsand-Xmxat startup
Code system licenses and files
SNOMED CT and LOINC are not freely downloadable without registration, so secure your licenses before deployment. SNOMED CT requires a license from SNOMED International or your national release center. LOINC requires a free account at the Regenstrief Institute. Download the full release files in their native formats (RF2 for SNOMED, CSV package for LOINC) before attempting to load them into HAPI.
Here is where to get each major code system file:
- SNOMED CT: SNOMED International member portal or your national release center
- LOINC: Regenstrief Institute download portal (free registration required)
- ICD-10: Centers for Medicare and Medicaid Services (CMS) free download
- RxNorm: National Library of Medicine (NLM) full release files or RxNorm API
Step 1. Deploy HAPI FHIR JPA with terminology enabled
The fastest way to get a HAPI FHIR terminology server running is through Docker. The official HAPI FHIR JPA server image includes everything you need, but terminology support is not active by default. You need to set specific environment variables and mount a configuration file before the server can handle $validate-code or $expand requests correctly.
Pull and start the HAPI FHIR container
Run the following command to pull the latest HAPI FHIR JPA image and start it with terminology operations enabled and your PostgreSQL database connected:
docker run -d \
  --name hapi-fhir \
  -p 8080:8080 \
  -e spring.datasource.url=jdbc:postgresql://your-db-host:5432/hapi \
  -e spring.datasource.username=hapi_user \
  -e spring.datasource.password=your_password \
  -e hapi.fhir.enable_index_missing_fields=true \
  -e hapi.fhir.tester.home.server_address=http://localhost:8080/fhir \
  hapiproject/hapi:latest
Replace your-db-host and your_password with your actual PostgreSQL connection details before running this.
Enable terminology indexing in application.yaml
Docker environment variables handle the basics, but full terminology indexing requires an application.yaml override. Mount this file at /app/config/application.yaml inside your container:
hapi:
  fhir:
    fhir_version: R4
    enable_index_missing_fields: true
    allow_external_references: true
    enable_repository_validating_interceptor: true
    tester:
      home:
        name: HAPI FHIR Server
        server_address: http://localhost:8080/fhir
Set
allow_external_referencestotrueif your ValueSet resources reference external URLs, otherwise HAPI will reject them during validation.
After the container starts, confirm the server is healthy by hitting http://localhost:8080/fhir/metadata and verifying the CapabilityStatement loads without errors.
Step 2. Choose local vs remote terminology
HAPI FHIR gives you two options for resolving terminology: local mode, where code system data lives in your own database, and remote mode, where HAPI delegates validation requests to an external terminology server. Picking the wrong mode for your use case creates either performance bottlenecks or unnecessary infrastructure complexity, so make this decision before you load any data.

Local mode: full control, higher resource cost
Local mode stores every concept, relationship, and hierarchy in your PostgreSQL database. Your HAPI FHIR terminology server handles every $validate-code and $expand call without any outbound network requests, which makes it the right choice for production environments with strict latency requirements or air-gapped deployments. The tradeoff is resource cost: you own the loading, indexing, and update cycle for every code system you run.
Enable local mode in your application.yaml by confirming terminology is loaded directly through the FHIR API rather than delegated externally. No extra configuration key is needed; HAPI defaults to local resolution once you load a CodeSystem resource with full concept content included.
Use local mode for any production workload where response time consistency matters, or where your environment cannot make outbound HTTPS calls to external servers.
Remote mode: delegate to an external server
Remote mode tells HAPI to forward unresolved terminology calls to an external terminology service configured in your application.yaml. Add the following block to delegate SNOMED CT validation to a public FHIR terminology server:
hapi:
  fhir:
    remote_terminology_service_urls:
      - url: https://tx.fhir.org/r4
This approach works well for development and staging environments where loading full code systems locally is impractical, but avoid it in production because external network latency will degrade your response times.
Step 3. Load code systems and value sets
Loading terminology into your HAPI FHIR terminology server happens through the standard FHIR REST API using HTTP POST requests. HAPI processes each uploaded CodeSystem or ValueSet resource and indexes every concept into the database, which means large files like SNOMED CT can take several hours to fully index. Plan your load jobs during off-peak windows and monitor database activity throughout.

Upload code systems with HTTP POST
Send your CodeSystem resource directly to the FHIR endpoint using curl or any HTTP client. The example below uploads a LOINC CodeSystem file you've already converted to FHIR JSON format:
curl -X POST \
  http://localhost:8080/fhir/CodeSystem \
  -H "Content-Type: application/fhir+json" \
  -d @loinc-codesystem.json
For SNOMED CT in RF2 format, HAPI provides a dedicated upload endpoint that handles the binary package directly without requiring manual JSON conversion:
curl -X POST \
  "http://localhost:8080/fhir/$upload-external-code-system" \
  -H "Content-Type: multipart/form-data" \
  -F "codeSystemType=SNOMED_CT" \
  -F "file=@SnomedCT_InternationalRF2_PRODUCTION.zip"
SNOMED CT indexing via
$upload-external-code-systemruns as a background job, so a successful HTTP response does not mean indexing is complete. Check the server logs for a "Completed pre-expansion" message before running validation queries.
Verify the load completed successfully
After uploading, confirm your CodeSystem loaded correctly by calling the $lookup operation against a known concept code. A valid response means HAPI has indexed the content and is ready to serve terminology requests. Run this check before pointing any application traffic at the server:
curl "http://localhost:8080/fhir/CodeSystem/$lookup?system=http://loinc.org&code=718-7"
A successful response returns the concept display name and full property set. An error means indexing failed or the system URL does not match what was stored during upload.
Step 4. Run common terminology operations
With your code systems loaded, your HAPI FHIR terminology server is ready to handle real clinical terminology requests. Two operations cover the vast majority of use cases: $validate-code checks whether a given code belongs to a specific system or value set, and $expand returns the full list of concepts within a value set. Both operations use standard GET or POST requests against the FHIR endpoint, so any HTTP client works.
Validate a code with $validate-code
Use $validate-code any time your application needs to confirm that a clinical code is valid and active within a code system before storing or transmitting it. Send a GET request with the system and code parameters to receive an immediate true or false response:
curl "http://localhost:8080/fhir/CodeSystem/$validate-code?url=http://loinc.org&code=718-7"
A successful response returns a Parameters resource where the result value is true. If the code is invalid or inactive, HAPI returns false along with a human-readable message explaining why validation failed.
Always check the
messagefield in the response, not just theresultboolean, because HAPI sometimes returnsfalsewith a deprecation warning rather than a hard failure for retired codes.
Expand a value set with $expand
The $expand operation resolves a ValueSet into its full list of concepts, which your application can then display in a dropdown, validate against, or export. Call it by referencing a ValueSet by its canonical URL:
curl "http://localhost:8080/fhir/ValueSet/$expand?url=http://hl7.org/fhir/ValueSet/observation-status"
Use the count and offset parameters to paginate large expansions rather than pulling the entire concept list in a single response, which can cause memory pressure on both the server and client.
Wrap-up and where to go next
You now have a working path from bare metal to a production-ready HAPI FHIR terminology server: infrastructure sizing, Docker deployment, local versus remote mode selection, code system loading, and the two core operations your applications will call most. Each step builds on the last, so work through them in order rather than jumping ahead to loading SNOMED CT before your database and JVM are properly tuned.
Running your own terminology infrastructure gives you full control over code system versions and validation behavior, but it also puts every update cycle, index rebuild, and uptime decision on your team. If managing that overhead pulls focus away from your actual application, SoFaaS handles the underlying FHIR integration layer for you. Connect your healthcare app to EHRs without the infrastructure work and ship faster without trading away reliability or compliance.
The Future of Patient Logistics
Exploring the future of all things related to patient logistics, technology and how AI is going to re-shape the way we deliver care.
Thank you! Your submission has been received!
Oops! Something went wrong while submitting the form.