Envoy Proxy mTLS: How to Configure Mutual TLS End-to-End

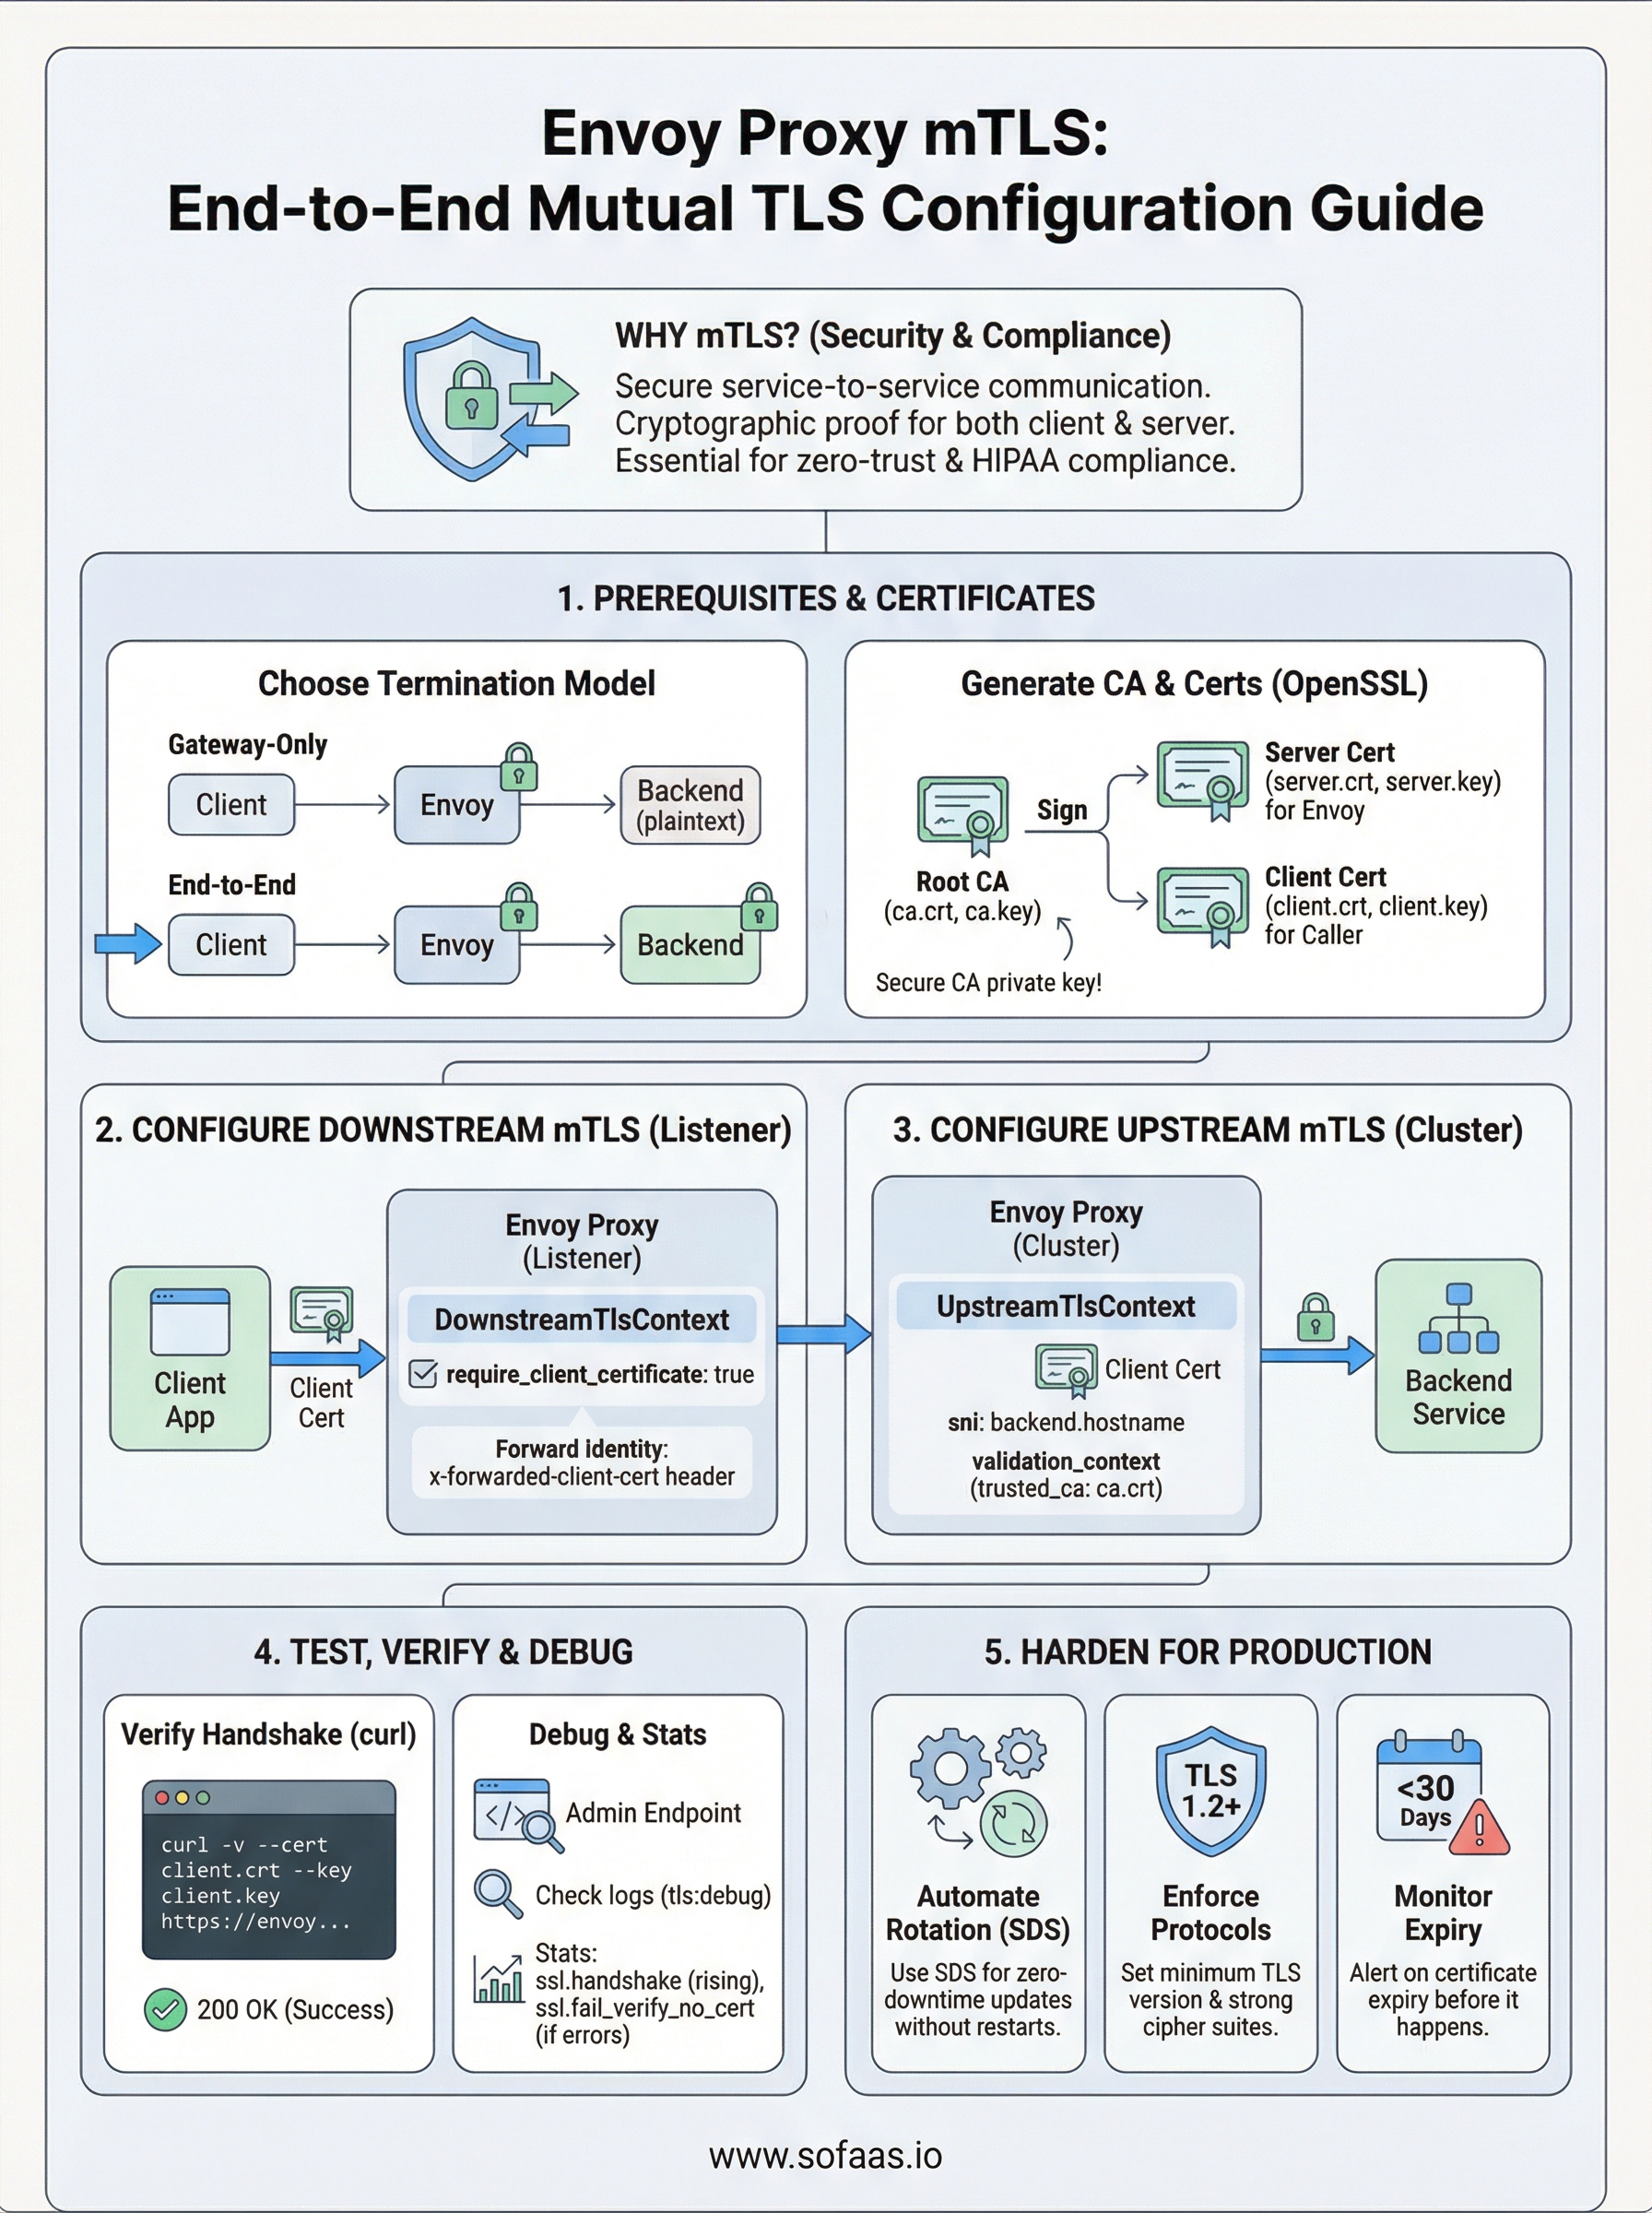
Securing service-to-service communication isn't optional when you're moving sensitive data between systems, especially in healthcare. Envoy Proxy mTLS (mutual TLS) gives you cryptographic proof that both sides of a connection are who they claim to be, not just the server. Every request is authenticated, every response is encrypted, and no traffic flows without verified certificates on both ends.
At SoFaaS, we built our managed SMART on FHIR platform on infrastructure that demands this level of security. When healthcare applications exchange patient data with EHRs through our unified API, mutual TLS is part of how we enforce HIPAA-compliant, end-to-end encryption across every connection. Envoy sits at the core of many modern service meshes and API gateways precisely because it handles mTLS well, but configuring it correctly requires careful attention to certificate chains, SDS, and upstream/downstream TLS contexts.
This guide walks you through a complete Envoy Proxy mTLS setup, from generating your certificate authority and client/server certs to configuring Envoy's listeners and clusters for full mutual authentication. You'll get working configuration examples, troubleshooting steps for common certificate errors, and practical patterns for deploying mTLS in production environments. Whether you're securing microservices behind a gateway or locking down external API traffic, this is the reference you need to get it right the first time.
Decide your mTLS model and prerequisites
Before you write a single line of Envoy configuration, you need to know exactly where mutual TLS terminates in your architecture. Getting this wrong means you either leave gaps in your security posture or create certificate management overhead you didn't plan for. Envoy proxy mTLS supports several different termination patterns, and the right one depends on how many hops your traffic makes and what level of trust you extend to your internal network.
Your termination model determines how many certificate pairs you need to manage, so nail this down before you generate a single cert.
Choose your termination model
The three most common patterns you'll encounter are gateway-only termination, end-to-end mTLS, and sidecar mesh mTLS. In gateway-only termination, Envoy authenticates the client at the edge but then forwards plaintext to your backend services. This is simpler to operate but creates a trust gap inside your network perimeter. End-to-end mTLS pushes the verification all the way through, so Envoy authenticates the downstream client and also presents a certificate to your upstream backend service.
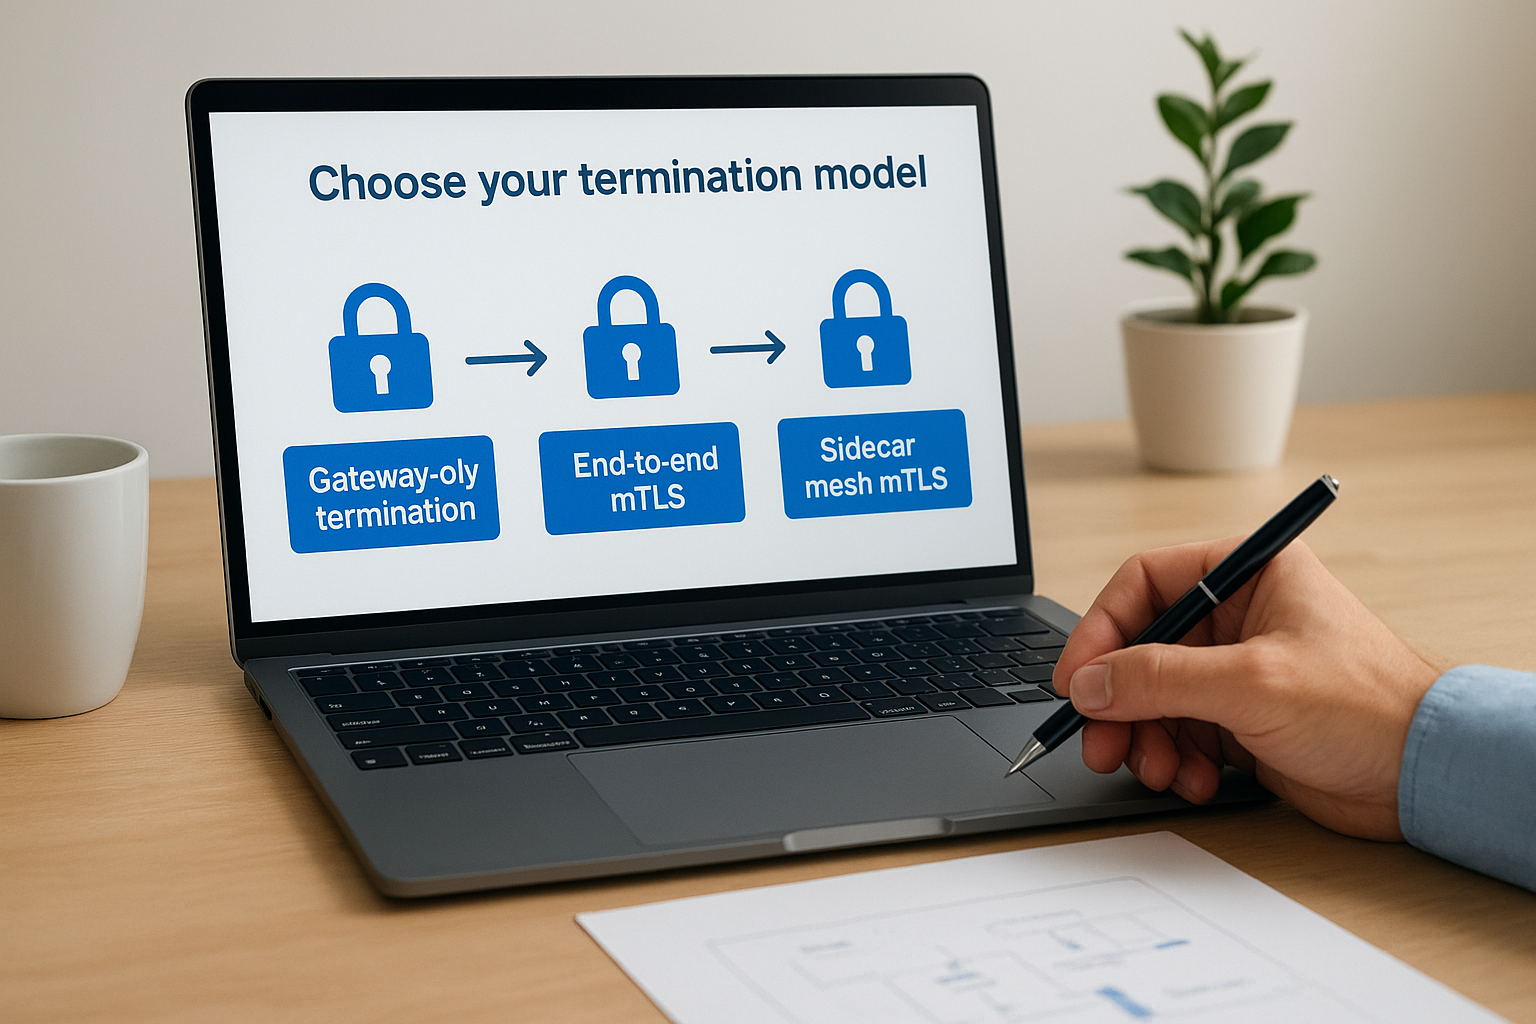
Sidecar mesh mTLS, which service meshes like Istio use under the hood, places an Envoy sidecar next to every service and handles certificate rotation automatically. This guide covers the gateway and end-to-end patterns because they apply to standalone Envoy deployments without a full mesh. If you're running a mesh, your control plane manages most of this for you, but understanding the underlying mechanics still matters when you debug certificate errors.
| Model | Downstream mTLS | Upstream mTLS | Best for |
|---|---|---|---|
| Gateway termination | Yes | No | Trusted internal network |
| End-to-end mTLS | Yes | Yes | Zero-trust, regulated data |
| Sidecar mesh | Managed by mesh | Managed by mesh | Microservice-heavy deployments |
Prerequisites you need before you start
You need a few things in place before you start generating certificates and writing YAML. On the tooling side, you need OpenSSL (version 1.1.1 or later) or a comparable tool like cfssl to create your certificate authority and sign certificates. You also need a running Envoy binary (version 1.18 or later is recommended to get full SDS support) or a Docker image you can reference in a Compose file.
On the knowledge side, you should understand the difference between a CA certificate, a server certificate, and a client certificate. Each plays a different role in the mTLS handshake. Your CA certificate is the trust anchor. Your server certificate proves Envoy's identity to the client. Your client certificate proves the caller's identity to Envoy, which is the piece that makes the authentication mutual rather than standard one-way TLS.
You also need to decide whether you'll use static file-based secrets or Envoy's Secret Discovery Service (SDS) to deliver certificates. Static files work fine for development and simple deployments. SDS is the production path because it lets you rotate certificates without restarting Envoy. This guide shows both approaches so you can choose based on your environment.
Step 1. Create a CA and issue certificates
Every envoy proxy mTLS setup starts here. You need a certificate authority that signs both your server certificate (which Envoy presents to clients) and your client certificate (which callers present to Envoy). Using a shared CA is what lets each side verify the other, so don't skip creating a dedicated CA just for this purpose, even in staging environments.
Create the root CA
Run these commands to generate a self-signed CA key and certificate. Keep your CA private key secured and never distribute it.
# Generate the CA private key
openssl genrsa -out ca.key 4096

# Generate the CA self-signed certificate (valid 10 years)
openssl req -new -x509 -days 3650 -key ca.key -out ca.crt \
  -subj "/CN=MyEnvoyCA/O=MyOrg"
You now have ca.key and ca.crt. Every certificate you issue in the following steps will be signed with these two files, so protect them as you would any root trust anchor.
If you lose the CA private key, every certificate signed by it becomes unverifiable. Store it in a secrets manager from day one.
Issue the server certificate for Envoy
Your server certificate identifies Envoy to downstream clients. The Common Name (CN) or Subject Alternative Name (SAN) must match the hostname your clients connect to. Set the SAN correctly or your clients will reject the handshake.
# Generate Envoy's server key
openssl genrsa -out server.key 2048

# Create a CSR
openssl req -new -key server.key -out server.csr \
  -subj "/CN=envoy.example.com/O=MyOrg"

# Sign the certificate with your CA
openssl x509 -req -days 365 -in server.csr \
  -CA ca.crt -CAkey ca.key -CAcreateserial \
  -out server.crt \
  -extfile <(printf "subjectAltName=DNS:envoy.example.com")
Issue the client certificate
Your client certificate is what proves the caller's identity to Envoy. You create it the same way you created the server certificate, but with a CN that identifies the calling service rather than a hostname.
# Generate client key and CSR
openssl genrsa -out client.key 2048
openssl req -new -key client.key -out client.csr \
  -subj "/CN=my-client-service/O=MyOrg"

# Sign with the CA
openssl x509 -req -days 365 -in client.csr \
  -CA ca.crt -CAkey ca.key -CAcreateserial \
  -out client.crt
After these steps, you have six files: ca.crt, server.key, server.crt, client.key, client.crt, and ca.srl. Copy ca.crt, server.key, and server.crt to your Envoy host. Your client application needs ca.crt, client.key, and client.crt.
Step 2. Configure downstream mTLS in Envoy
Downstream mTLS is what Envoy presents to callers and what Envoy requires callers to present back. You configure this inside the listener's transport_socket block using a DownstreamTlsContext. This is where envoy proxy mTLS comes to life in practice, and getting the require_client_certificate flag right is the most common point where configurations fail silently.
Define the listener transport socket
Your listener block needs a transport_socket entry that references both your server certificate and your CA. The CA reference is what tells Envoy which certificates to trust when a client sends its certificate during the handshake. Without a validation_context, Envoy will accept any valid certificate, which defeats the purpose of mutual authentication.

static_resources:
  listeners:
  - name: listener_0
    address:
      socket_address:
        address: 0.0.0.0
        port_value: 8443
    filter_chains:
    - transport_socket:
        name: envoy.transport_sockets.tls
        typed_config:
          "@type": type.googleapis.com/envoy.extensions.transport_sockets.tls.v3.DownstreamTlsContext
          require_client_certificate: true
          common_tls_context:
            tls_certificates:
            - certificate_chain:
                filename: "/etc/envoy/certs/server.crt"
              private_key:
                filename: "/etc/envoy/certs/server.key"
            validation_context:
              trusted_ca:
                filename: "/etc/envoy/certs/ca.crt"
      filters:
      - name: envoy.filters.network.http_connection_manager
        typed_config:
          "@type": type.googleapis.com/envoy.extensions.filters.network.http_connection_manager.v3.HttpConnectionManager
          stat_prefix: ingress_http
          route_config:
            name: local_route
            virtual_hosts:
            - name: local_service
              domains: ["*"]
              routes:
              - match:
                  prefix: "/"
                route:
                  cluster: backend_cluster
          http_filters:
          - name: envoy.filters.http.router
            typed_config:
              "@type": type.googleapis.com/envoy.extensions.filters.http.router.v3.Router
Setting
require_client_certificate: trueis non-negotiable for genuine mutual TLS. Leaving it false turns this into standard one-way TLS, which gives you encryption but no client authentication.
Extract the client identity from the certificate
Once Envoy verifies the client certificate, you can forward the client's identity to your backend as an HTTP header. This lets your backend services make authorization decisions based on the verified CN without re-implementing certificate parsing. Add the following inside your HttpConnectionManager config to forward the peer certificate's subject:
forward_client_cert_details: SANITIZE_SET
set_current_client_cert_details:
  subject: true
  dns: true
With this in place, your upstream service receives an x-forwarded-client-cert header containing the verified subject of the calling service's certificate, giving you a clean audit trail on every request.
Step 3. Configure upstream mTLS to the backend
Upstream mTLS flips the role Envoy played in the previous step. Here, Envoy acts as the client connecting to your backend service, which means Envoy must present a certificate to the backend and verify the backend's certificate in return. You configure this at the cluster level using an UpstreamTlsContext inside the cluster's transport_socket block. This is the second half of a true end-to-end envoy proxy mTLS setup, and it's the piece most teams skip, leaving their internal connections unprotected.
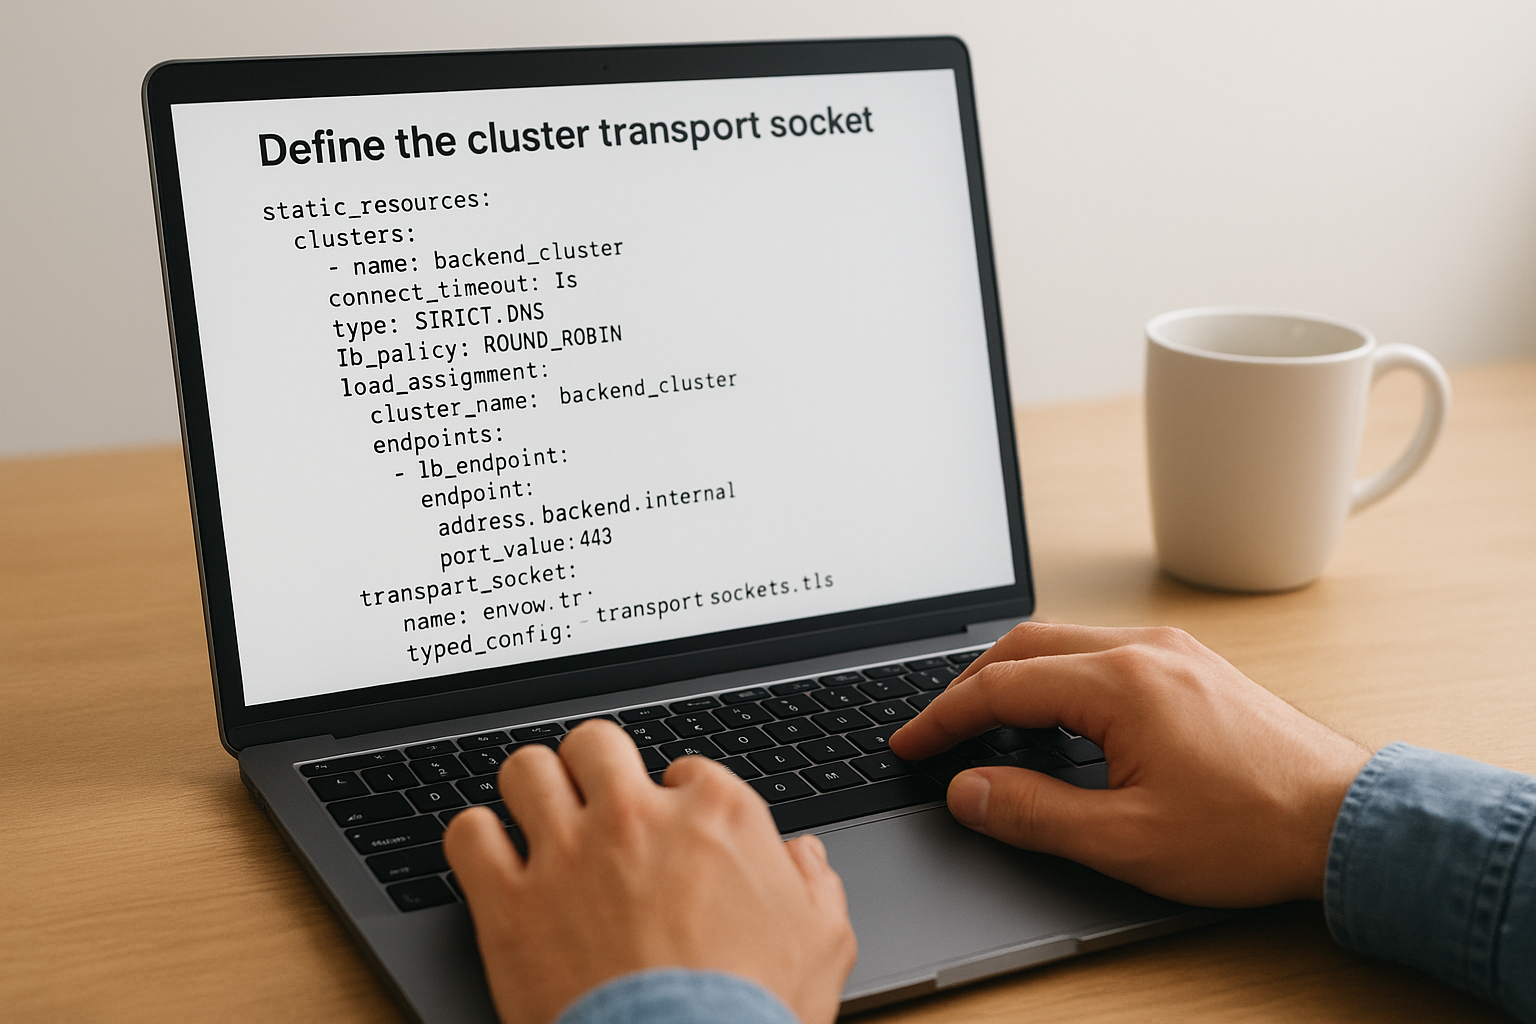
Define the cluster transport socket
Your cluster block needs a transport_socket entry that tells Envoy which certificate to present to the backend and which CA to use for verifying the backend's identity. The sni field is important here: it tells Envoy what hostname to send during the TLS handshake, which the backend uses to select the right certificate if it serves multiple domains.
static_resources:
  clusters:
  - name: backend_cluster
    connect_timeout: 1s
    type: STRICT_DNS
    lb_policy: ROUND_ROBIN
    load_assignment:
      cluster_name: backend_cluster
      endpoints:
      - lb_endpoints:
        - endpoint:
            address:
              socket_address:
                address: backend.internal
                port_value: 443
    transport_socket:
      name: envoy.transport_sockets.tls
      typed_config:
        "@type": type.googleapis.com/envoy.extensions.transport_sockets.tls.v3.UpstreamTlsContext
        sni: backend.internal
        common_tls_context:
          tls_certificates:
          - certificate_chain:
              filename: "/etc/envoy/certs/client.crt"
            private_key:
              filename: "/etc/envoy/certs/client.key"
          validation_context:
            trusted_ca:
              filename: "/etc/envoy/certs/ca.crt"
If you omit
validation_contextfrom your upstream cluster, Envoy skips backend certificate verification entirely, turning your upstream connection into unverified TLS where any server could impersonate your backend.
Match the certificate CN to your backend's expectations
Your backend service needs to accept the client certificate Envoy presents. The CN you set when you generated the client certificate in Step 1 is what the backend sees as the caller identity. Make sure your backend's authorization layer is configured to trust that specific CN before you deploy. If your backend uses a different CA to validate clients, you need a separate client certificate signed by that CA instead. Keep your certificate inventory documented so you know exactly which cert each cluster uses when rotation time comes.
Step 4. Test, verify, and debug the handshake
With your downstream and upstream configurations in place, you need to verify that the handshake works before you send real traffic through your deployment. Testing your envoy proxy mTLS setup is not optional, and doing it systematically saves you hours of confusion when something fails in production. The tools you need are already on most systems.
Verify the handshake with curl
The fastest way to test your downstream mTLS configuration is with a single curl command that presents the client certificate. This confirms that Envoy accepts the client cert, verifies it against your CA, and routes the request to the backend.
curl -v \
  --cacert /path/to/ca.crt \
  --cert /path/to/client.crt \
  --key /path/to/client.key \
  https://envoy.example.com:8443/
Watch the verbose output for the SSL connection using line and the Server certificate block. If you see a 200 response, both the server certificate and your client certificate passed verification. If you see SSL: certificate verify failed, your CA cert does not match the one that signed Envoy's server certificate. Fix the --cacert path first before digging further.
A
curltest with the correct CA but a deliberately wrong client cert is also useful: Envoy should return a400 Bad RequestwithSSL routines:tls_process_client_certificatein the error, confirming thatrequire_client_certificateis working as intended.
Read Envoy's access logs and debug output
When curl gives you a TLS error, Envoy's logs tell you exactly which step in the handshake failed. Run Envoy with --component-log-level tls:debug during troubleshooting to get detailed certificate negotiation output in your console.
envoy -c /etc/envoy/envoy.yaml \
  --component-log-level tls:debug,conn_handler:debug
Look for lines containing ssl_socket_impl in the debug output. A missing subjectAltName in your server certificate shows up as certificate verify failed (no alternative certificate subject name matches). A CA mismatch shows up as certificate verify failed (self-signed certificate in certificate chain). Both errors point directly at the certificate file you need to fix.
Check the admin endpoint for TLS stats
Envoy's admin interface exposes counters that confirm whether your mTLS configuration is actively accepting connections. Hit the stats endpoint and filter for TLS-related metrics.
curl http://localhost:9901/stats | grep -E "ssl\.(handshake|fail|no_certificate)"
A rising ssl.handshake counter confirms successful mutual TLS handshakes. A rising ssl.fail_verify_no_cert counter means clients are connecting without presenting a certificate, which usually points to a misconfigured client application or a missing cert path in your test command.
Step 5. Harden mTLS for production operations
A working envoy proxy mTLS configuration in development is only the starting point. Production deployments demand certificate rotation automation, strict protocol enforcement, and expiry monitoring to stay secure without creating operational incidents. The steps below convert your functional setup into something that can run reliably under real load without requiring manual intervention every time a certificate expires.
Automate certificate rotation with SDS
Static file-based certificates force you to restart Envoy when a cert expires, which causes downtime. Envoy's Secret Discovery Service (SDS) solves this by letting you push updated certificates to a running Envoy process without any restart. Your SDS configuration replaces the filename references in your common_tls_context with inline sds_config references that point to a local socket or gRPC endpoint.
common_tls_context:
  tls_certificate_sds_secret_configs:
  - name: server_cert
    sds_config:
      path: /etc/envoy/sds/server_cert.yaml
  combined_validation_context:
    default_validation_context: {}
    validation_context_sds_secret_config:
      name: validation_ctx
      sds_config:
        path: /etc/envoy/sds/ca_cert.yaml
When you use SDS with file-based paths, Envoy watches the referenced files and reloads secrets automatically when the files change, giving you zero-downtime rotation without a full control plane.
Enforce minimum TLS version and cipher suites
Leaving your TLS parameters at defaults means old clients can negotiate weak cipher suites or outdated protocol versions like TLS 1.0. Add a tls_params block inside your common_tls_context to explicitly set TLS 1.2 as the minimum version and restrict ciphers to those recommended by current NIST guidance.
common_tls_context:
  tls_params:
    tls_minimum_protocol_version: TLSv1_2
    tls_maximum_protocol_version: TLSv1_3
    cipher_suites:
    - ECDHE-ECDSA-AES256-GCM-SHA384
    - ECDHE-RSA-AES256-GCM-SHA384
    - ECDHE-ECDSA-CHACHA20-POLY1305
Apply this block to both your DownstreamTlsContext and UpstreamTlsContext so the restriction covers every hop in your chain.
Set certificate expiry alerts
Expired certificates are the most common cause of mTLS outages, and they are entirely preventable. Use Envoy's built-in stats to track certificate lifetimes and alert before anything expires. The admin endpoint exposes ssl.certificate_expiry_days gauges you can scrape with Prometheus and alert on when they drop below your rotation buffer.
curl http://localhost:9901/stats | grep certificate_expiry
Set your alert threshold at 30 days before expiry and your rotation target at 45 days. That window gives your team enough time to rotate through your normal change process without rushing, even if the first rotation attempt fails.
Wrap-up and next steps
You now have a complete envoy proxy mTLS implementation, from generating your CA and certificates through configuring downstream and upstream TLS contexts, testing the handshake, and hardening the setup for production. Each step builds on the previous one, so if you run into issues, start at the certificate layer and work forward rather than jumping straight to Envoy configuration.
The patterns in this guide apply directly to healthcare environments where HIPAA compliance and zero-trust architecture are requirements, not optional features. Every patient data exchange needs the same level of cryptographic verification you just built. If your application also needs to integrate with EHR systems like Epic or Cerner, that integration layer carries its own security and compliance requirements on top of your transport security.
SoFaaS handles the EHR integration complexity so your team can stay focused on application logic. Connect your healthcare app to EHRs in days instead of spending months building and maintaining integration infrastructure from scratch.
The Future of Patient Logistics
Exploring the future of all things related to patient logistics, technology and how AI is going to re-shape the way we deliver care.
Thank you! Your submission has been received!
Oops! Something went wrong while submitting the form.